![]()
HPE Links: Home | Links | Search HPE | FAQ | New Projects
V8-Ranger Links: FrankenRanger | Articles | Suppliers | Parts List
V8 Ranger Conversion Manuals: Conversion Manuals
| Downloadable Manuals | Manual Feedback
|
|
|
|
ENGINE REMOVAL There really
isn’t any right or wrong way to remove an engine.
Builders each have their own preferences on which should come first, but they all
agree on the basics: drain everything,
disconnect everything, and remove the smallest parts first, largest parts last (engine and
transmission). It is also helpful to make the
engine as compact as possible by removing the accessories, exhaust manifolds, and
electronics before removing the block from the truck. I won’t go into exact
details on how to remove the engine from the truck, since it should be fairly
self-explanatory, but I will offer some observations and tips on the procedure: 1)
Disconnect and remove the battery. Store
it safely (keep it off the pavement to preserve its charge). 2)
Remove the hood. It is useful to mark
the hinge locations on the hood with masking tape to facilitate reinstallation after the
new engine is installed. There are usually
two bolts holding the Ranger’s hood to the hinges. 3)
Remove front grille and
headlight surround to prevent damage and improve access to the front of engine. Most of the headlight surrounds are secured by a
combination of phillips-head screws and small nuts. If
the surround does not come off easily, check to be sure you have removed all the
fasteners. On the ’93 to ’97
Rangers, there are 5 phillips-head screws along the top of the surround that must be
removed. Use care when removing this piece as
it will crack easily. Store it somewhere it
will not be damaged. 4)
Jack the truck up and support at all 4 corners with quality jackstands. I prefer to place the stands under the frame rails
rather than under the suspension to keep the truck from shifting as weight is removed and
added during the swap. It’s much safer
this way. 5)
Drain all fluids: Oil, transmission
fluid, power steering, coolant, and depressurize fuel system using the correct tools. Dispose of all used fluids properly. If your Ranger has air conditioning, have a
professional purge the system and recover the refrigerant properly. 6)
Remove exhaust system. A little bit of
penetrating oil on the header bolts will help with their safe removal. Be sure to
disconnect the oxygen sensor(s) before dropping the Y-pipe and catalyst from the truck. The over-axle tube may need to be cut to be
removed unless you have access to a lift. 7)
Remove the driveshaft. On standard cab
Rangers, the driveshaft is a 1-piece design, while extended cab Rangers use a 2-piece
driveshaft. The only difference in removal is
the center bearing support that must be removed with the 2-piece driveshaft (it’s
secured with two nuts under the middle crossmember).
On the rear differential, remove the 4 bolts securing the U-joint straps to the
differential yoke. The U-joint should remain
attached to the driveshaft. Once you have all
the bolts removed, drop the driveshaft and slide it out of the rear of the transmission
(there are no fasteners securing the driveshaft to the transmission). You may need a partner for this to prevent damage
to the driveshaft or transmission. Also be
ready for a possible trickle of transmission fluid out of the back of the transmission
when the driveshaft is removed. 8)
Remove radiator. Use care not to
damage the core on engine pulleys. Having a
friend to help is useful at this point. If
your Ranger has A/C, it is not necessary to remove the A/C condenser, but it is a good
idea to protect it from within the engine compartment with a sheet of cardboard. 9)
Disconnect A/C refrigerant lines. On
R-12 systems (pre-1993), the lines are removed by loosening the large sleeve nuts on the
back of the compressor. On R-134a (later
models) systems, the A/C lines are removed as a unit with a single 10mm bolt in the center
of the refrigerant manifold block on the back of the compressor. You can also use your fuel line disconnect tools
to disconnect the refrigerant lines from the evaporator canister on the passenger side of
the car. DO NOT VENTILATE REFRIGERANT TO THE
ATMOSPHERE—HAVE A PROFESSIONAL DISCHARGE THE SYSTEM BEFORE STARTING ENGINE REMOVAL. 10) Disconnect
fuel lines. The location of fuel lines varies
from engine to engine. On carbureted engines,
simply locate the line feeding the carburetor and follow it to the fuel pump on the side
of the engine. On EFI motors, locate the
injectors and fuel rail and disconnect the fuel lines from the fuel rail. There should be both a feed and a return line. These can be disconnected using the fuel line
disconnect tools. Be sure to depressurize the
fuel system before opening it (many EFI fuel pressure gauges have a purge valve built in
for just this purpose). 11)
Disconnect all wiring connectors. It
is very useful to label what each connector was plugged in to, though very few connectors
will be reused with the V8. The connectors
can usually be carefully pulled apart by hand, but for stubborn connectors, use a
screwdriver to gently pry the retaining clip up over the retaining peg on the side of the
connector. If your Ranger has EFI, remove
the ECM from the truck before continuing to prevent damage. 12) Disconnect
all vacuum lines. It is very important to
label these lines as many of them will be reused with the V8. I find it most useful to label them at each end
indicating the item to which they are attached. 13) Unbolt
all accessories (alternator, A/C compressor, AIR pump, and power steering pump) and
brackets (if possible). In many cases, the
power steering pump cannot be removed without first removing the pulley, so remove the
entire bracket. 14) Remove
the starter and all cables attached to it. 15) On
manual transmission models, remove the shifter assembly; the shifter handle is secured to
the transmission with a collar fitting and a cam bolt. On automatic transmission
models, disconnect the linkage on the transmission and place it out of the way. 16) When
unbolting the transmission, use a floor jack under the transmission body. Gently wiggle it away from the engine block and it
should slowly separate itself. Be very
patient at this point so you don’t damage the input shaft or the clutch assembly (at
least if you’re going to try to resell them). NOTE: on Mazda 5-speed manual transmission
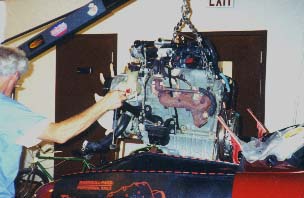
equipped Rangers, the transmission and bellhousing are integral and cannot be separated. 17) Get your engine hoist in position and secure the lifting chains to the motor. Most OEM motors should still have lifting brackets installed that you can connect to the cherry picker. A tilt hanger with a crank will help very much to remove and install the engine. Put just a little tension in the chains, then unbolt the engine mounts from the frame (front crossmember). Leave the engine mounts attached to the engine if possible.
18) Lift ‘er out and store the motor safely where it cannot fall or tip over. If the motor does not lift out easily, double check to be sure that everything is disconnected. Often, you’ll find a single ground strap or hose that you didn’t spot when the engine was still in the chassis. Do not just yank the motor using brute force, as you can cause a dangerous situation, not to mention damage to components you may need later.
This page accessed Page designed by Harwood Performance Engineering copyright (c) Harwood Performance Engineering, 1999, 2000 HARWOOD PERFORMANCE ENGINEERING IS NOT ASSOCIATED WITH |
|
[bottom.htm] |