What's up with this
banner thing?
If
you don't see a navigation bar on the left, CLICK HERE
|
|
|
April
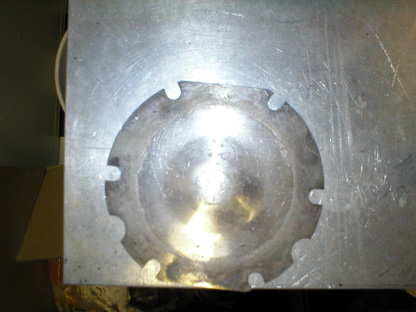
18, 2003 Powdercoating MadnessWell, I had planned on pulling the motor tomorrow, and doing the preparation today--I had my father and my buddies John and Tom ready to roll, but I could not find an engine stand that would handle the 862-pound straight-8. I have one that is rated for 1000 pounds and made for V8s, but I have concerns that the long straight-8 would be a longer lever arm and just bend the stand right over. Searching the Internet, I found several that were rated for 2000 pounds, one of them available at TP Tools, which isn't far from me. However, TP was sold out of them when I was there a few weeks ago, and they were still sold out as of Thursday when I planned to go down there and pick one up. I hate to say that I ordered one elsewhere, but I did. With luck, I should have it next week so next weekend we'll be ready to roll. I had to wave the guys off on the engine and stay busy doing other stuff. Not as interesting, but I learned a few other things today. Check it out... The first thing I tried to do was get those two broken bolts out of the water pump valve assembly (they broke off when I removed the water pump neck during engine disassembly). I bought some bolt extractors and some PB Blaster (amazing stuff--you can actually see it soaking into the threads right before your eyes!), and soaked the bolts for a few hours while I worked on other stuff. Later, I drilled progressively larger holes in the broken bolts, eventually making one big enough to handle one of the extractors. I screwed it in and started turning. You know what happened next: the extractor snapped off inside the bolt. So now I have to figure something else out because the center of the bolt is now filled with the hardest substance known to man, and there's no way to drill another hole in it to try again. I did manage to drill out the other bolt and drilled the hole oversize and re-tapped it with larger threads. I'll have to use a bigger bolt when I reinstall the water pump neck. Any suggestions for getting that other one out? Let me know. So with all these bare metal parts lying around, I had to get them coated with something to prevent rusting. So I got the powder coater out and got busy. Before I started powder coating, however, you might remember that I promised to show you the results of the Rusteco test on the horn vibrator plate. I poured some Rusteco in a plastic container and submerged the plate in the liquid and let it sit over night. Here's the BEFORE photo from a few days ago. Well, I have to admit, the stuff worked! Amazingly, the plate was clean and shiny the next morning, with no trace of the rust. The surface looked pitted and rusty, but it wasn't. It was just mottled, but still smooth to the touch. Neat.
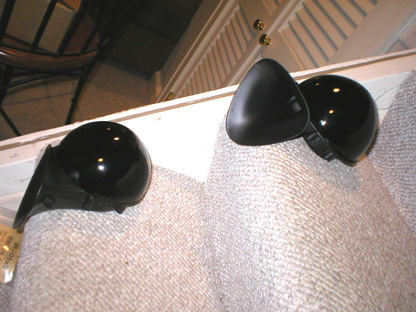
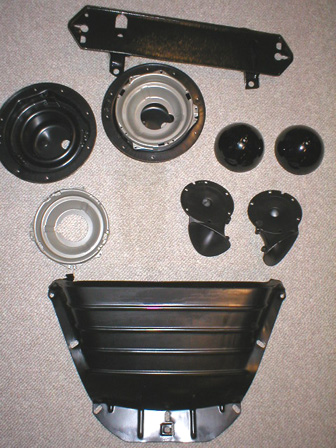
Then I started powder coating. The first things I coated were the headlight buckets using 60% black. While I had the 60% black loaded, I re-coated the radiator shroud that was just a little too flat. It looks correct now. I also powdered the battery tray 60% black and it looks pretty good. It was pretty rusty before I blasted it, so the finish isn't perfectly smooth, but nobody'll notice it down there in the engine compartment under the battery. Then I broke out the Mirror Black and coated the horn domes. The first coat had some debris in it, so I decided to sand it off and try to smooth it out, then re-coat. But I didn't realize that the Xylene I've been using to degrease the parts before powdercoating also seems to slightly soften the powder. So when I put on the second coat and baked it, the first coat bled through and discolored the second coat and wrecked the gloss effect. Rats. So I threw them in the blaster again. Let me tell you this: powdercoating has to be the ultimate coating for your parts. It's virtually indestructible. The blaster could barely make a dent in the stuff, flawed as it was. I spent about an hour doing just one dome--about four times longer than the first time. For the second dome, I changed abrasive to something more aggressive than the glass beads and it went a little quicker. Not much, though. Then I added an air filter just before the powder gun and sprayed a second coat. It turned out OK, but there was a thin spot on one of the domes that would be very noticeable once it was on the car. So I just left the domes hanging on the rack and put on a second coat, thicker than the first. When I pulled it out, they were perfect. Finally. I guess there are a few tricks to learn with the powdercoating, but I'm pleased with the results so far. I wonder if Mark Brown, my big item powdercoater, can powder an entire car body... The horn trumpets are supposed to be 30% black, so I switched powders and hung them from the rack. I coated them, but ran into the same problem--junk in the powder that showed in the final finish. So I sanded them, but didn't wipe them down with the Xylene. I just blew them off with the air gun and re-hung them. The second coat turned out nicely. The contrast between the shiny and flat portions of the horns is quite striking.
The last parts I coated were the headlight bulb aiming cups, which were originally gray. I used the same gray powder that I've been using on the suspension parts, and they turned out great with no problems.
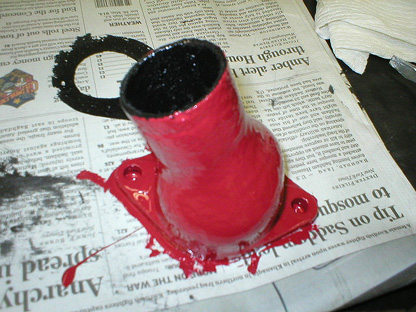
I also got my engine enamel from Bill Hirsch, and wanted to try it out. I had the water pump neck ready to go, so I painted the inside with POR-15 (good stuff) to seal it and prevent rust in the future, and painted the outside with the Dante Red engine enamel. Boy, it's bright! I can't wait to see what the entire engine looks like when it's done.
Previous
Restoration Day E-mail me at toolman8@sbcglobal.net This page accessed Thanks, Fidget! |