What's up with this
banner thing?
If
you don't see a navigation bar on the left, CLICK HERE
|
|
|
April
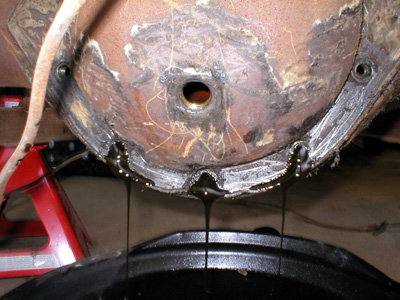
29, 2004 Rear Axle ExplorationI finally had the time to open up the differential and see what was going on inside. I hoped that it was in the same excellent condition as the innards of the transmission. The first thing I did was remove the drain plug in the differential cover. No oil came out--uh oh... Next, I scraped off some of the gunk caked on the differential housing, mostly a mixture of mud and differential oil. The good news is that this mixture pretty much preserved the bolts and differential cover in perfect condition. The 9/16" bolts were not very tight, and after breaking them loose with a wrench, I could remove them by hand. I found that the lower bolt holes go all the way through the housing, and when I removed them, oil started leaking out. So it wasn't totally empty, fortunately for me.
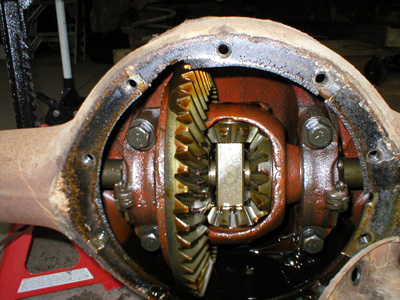
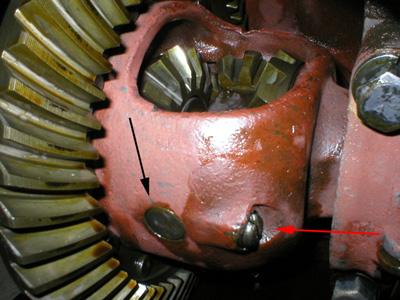
I pulled the cover off and was pleased to find that the gears are in remarkably good condition, just like the transmission. The teeth were strong and solid with the machining marks still visible on the edges. The carrier shows signs of having been repaired in the past, however, as the screw holding the spacer block is pretty chewed up. I was somewhat surprised by the rough casting of the carrier, but impressed by the robust bearing caps on either side. This is a pretty stout rear end.
I read the manual on disassembly, but it doesn't mention removing the spacer block (in the middle of the carrier in the photo above), or how it is done. There are two C-clips holding the axles in the carrier, and these cannot be removed until the spacer block comes out. I'm guessing that the aforementioned chewed-up screw is a sort of set screw holding the carrier block in position. I'm going to ask around before I start, just in case. If you have any ideas, I'd love to hear them. E-mail me!
Previous
Restoration Day E-mail me at toolman8@sbcglobal.net This page accessed Thanks, Fidget! |