What's up with this
banner thing?
If
you don't see a navigation bar on the left, CLICK HERE
|
|
|
August
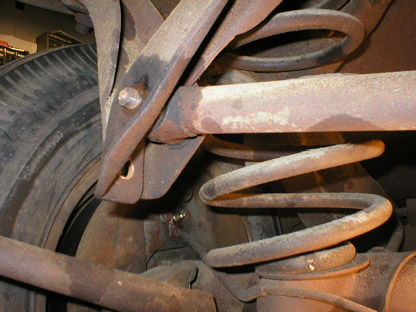
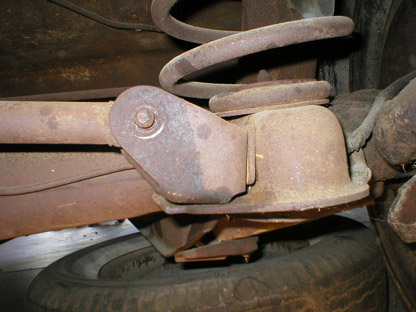
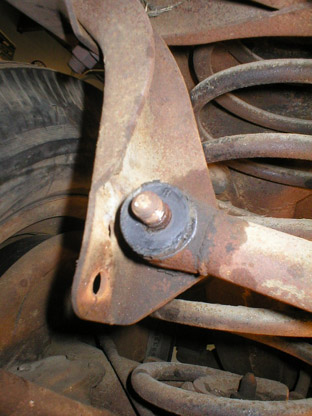
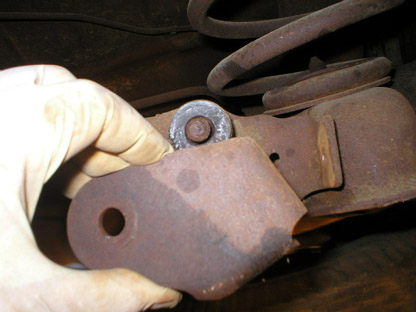
10, 2003 Gas Tank & Rear SuspensionFor some reason, I seem to have "lost" the photos of both the inside of my transmission and the gas tank. I'll have some new ones later today, maybe tomorrow. Oh, and my welder is delayed until September 1, so it will be some time after that when I get the body off (I have to brace the door openings before pulling the body). The lack of updates lately... hmmm, let's see... Oh, I was doing an "emergency" remodel on our kitchen. Well, it wasn't exactly an emergency, but I had the opportunity to purchase a $1300 refrigerator for $450 through a friend, so I took it (who wouldn't?). Unfortunately, it didn't fit into the space where our old refrigerator lived in the back hall of the kitchen. So we rearranged the stove, the refrigerator and some counters and cabinets to make room for it. We actually freed up a lot of space, made the working area more accessible and improved appearance. We painted, added some new lights and ceiling fan, a new microwave/exhaust hood, new dishwasher, and I took some Corian from my mom's old kitchen and cut it up to reuse in ours. Not counting appliances, it all cost less than $500. So that used up a few weekends. Like I said earlier, I took the lid off my transmission and had a look inside--it's perfect! I couldn't see any evidence of abuse or damage. The teeth still have machining marks on them and there is no sludge build-up inside the case. It moves easily through the gears, and I could see how everything fits together. If you've never seen the inside of a constant-mesh transmission, take a look--you'll be amazed how simple it really is. I'm not going to take it apart, unless I can just replace the front and rear seals without any major work. It's a pain in the neck to get this transmission out once the car is back together, so I may as well make it as good as new before I reinstall it. Then I went back under the car and pulled the gas tank. Easy job now that it was empty and light. I unbolted the two carrying straps that were secured with "J" bolts and nuts. After that, the tank was easy to lower to the ground, where I disconnected the fuel line and the fuel gauge sending unit wire (which looks like it was replaced not too long ago). The tank is in excellent condition with no signs of rust. I'm thinking that perhaps this tank was replaced in the not too distant past. Why, I don't know. There is some indication on the rear frame crossmember that something got bent, but it is bent the wrong way (back towards the bumper) to have been the result of a rear-end collision. I'll have it steam cleaned, but it doesn't need anything else. The gas gauge sending unit was also in good condition, though the cork float was pretty nasty. I'm going to try to replacing it with some sort of metal float. Now that I had clear access to the rear suspension, I decided to tackle it next. I had been soaking all the nuts and bolts with PB Blaster so they would come off easily. I decided the Panhard rod should go first, which would give me access to the control arm mounts and the shock absorbers mounted to the brake backing plates.
I wrestled with the brackets for a while, but finally got the rod and brackets off. I stamped the rod "R" and "L" so I can reinstall it correctly. It is made from surprisingly light tubing with forged ends welded on. I guess with bias-ply tires, there wasn't much grip to stress the parts. I'll powdercoat the brackets and have my large-item powdercoater do the rod itself when I take the frame in.
That's all the farther I got today. I'm going to remove the rear shocks next, then gear up for pulling the body. In the mean time before my welder arrives, I'll probably go back to powdercoating some of these parts I've been pulling lately. Previous
Restoration Day E-mail me at toolman8@sbcglobal.net This page accessed Thanks, Fidget! |