What's up with this
banner thing?
If
you don't see a navigation bar on the left, CLICK HERE
|
|
|
Amateur
Auto Restoration
Part
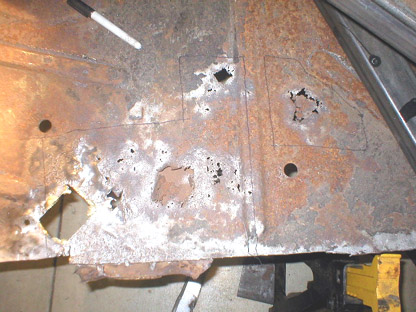
Five: Rust Repair If you’ve spent any time at all working on an old car, you’re probably very familiar with rust. Rust repair is by far the number-one problem an amateur faces when restoring an old car, and how it is repaired can make the car like new or destroy it forever. As a restorer, I’ve always felt that it was my duty to try to get each component as close to original condition as possible, whether it will be visible or not. Rust repairs are the most visible manifestation of this philosophy—there’s definitely a right way and a wrong way. It is also a very intimidating prospect if you’re unprepared for the magnitude of the task and just starting out. We’ll talk briefly about the wrong way to repair perforated sheet metal and then discuss a better way. Think of rust as a living, growing cancer on your vintage vehicle—you cannot ignore it, cover it with some miracle paint and hope that it won’t get any worse—it inevitably will. In the process, it’ll destroy everything else you’ve placed on top of it, including that shiny new paint job. With some modern urethane paints costing as much as $1000/gallon, do you really want to risk it? Some rust can be treated and removed by sanding and/or chemical means, and if the metal underneath is solid and smooth, there’s no need to cut and weld new metal in place. Unfortunately, with sheet metal this is rarely the case. Once rust has gotten a toe-hold in sheet metal, it’s often too late to bring it back because the pits that rust creates will leave the metal too thin to be saved—or worse, perforated.
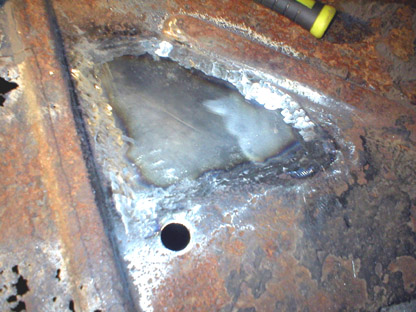
What is the wrong way to repair rust damage in sheet metal? As far as I’m concerned, it is any fix that doesn’t involve cutting it out and replacing it with fresh metal. More than a few body shops take the “out of sight, out of mind” approach, using paint and plastic filler to compensate for inferior rust repair work. Cars that have been repaired using cut-rate techniques and materials are usually easy to spot, with wavy body panels, pock-marked rockers and inevitably, cracked paint. Careless workers grind out most of the rust with a grinding wheel or sander, throw some fiberglass tape over the hole, cover it with filler, sand it smooth, then paint it. This is how you fix a hole in drywall, not sheet metal! Too many smart people have been convinced that this is the right way to do it by a smooth-talking guy in a body shop, but it’s total hack work and a temporary solution at best. Filler certainly has its place, even in a top-quality restoration, but it isn’t designed to fill large holes. Don’t be fooled if you are paying someone to repair the rust on your collector car, and don’t think it is the easy way out if you are doing it yourself. No good will come of it. Properly repairing rust is not complicated—just cut out the old and weld in the new. Yes, it takes some specialized equipment like a welder, and it will definitely require practice to learn to join thin sheet metal, but it is a skill at which any amateur restorer can become reasonably proficient. There may be some tasks best left to professionals (recreating complex shapes or large panels that are not reproduced, for example), but if your car is fairly solid, then the repairs to commonly rusted areas such as rocker panels, door bottoms, inner fenders and floors can be done at home by an amateur with professional-grade results. Let’s walk through the process:
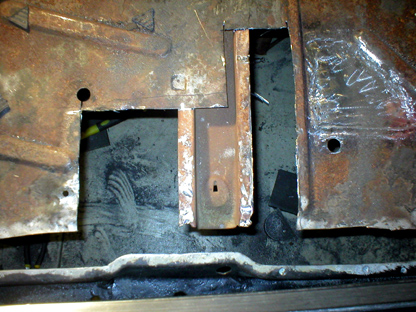
I recommend cutting in straight lines. Round shapes are much harder to cut out of the replacement material, and make getting a tight fit more difficult. You will often find that it is necessary to make an unusual shape, but if you keep the lines straight, it will be much easier to achieve a tight fit with your patch.
Finally, don’t be afraid of cutting your car. I know it’s intimidating at first, but if you plan carefully, it’s rare to have a catastrophic failure when cutting metal from an isolated area. Well, I suppose there was that one time in high school where we cut the roof off a buddy’s Ford Maverick to make it a convertible and later had to weld it back on at the behest of his father, but I digress.
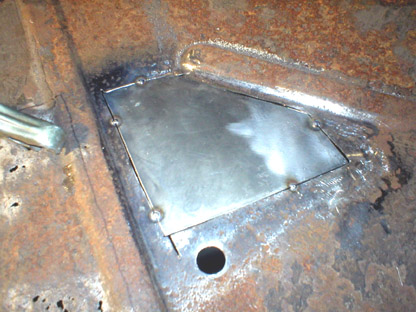
Getting the patch to fit is
by far the most difficult part of this process and if I can do it, you can do
it, too. All it takes is practice. Always remember that the restoration
process is a journey you should enjoy, not merely a destination.
I will say that no matter which type of
welder you choose to use, practice first. Get some scrap metal and
practice welding just to get a feel for what makes a good weld. Start with
heavier stock so you don’t have to worry so much about burning through or
warping the metal while getting a feel for the process. Once you’ve got some
competency there, practice on some sheet metal that is the same gauge as the
metal you will be working with on your patch panels. Do experiments so you know
how much heat you can apply before you burn through or how long a bead you can
run before the metal starts to warp. I had a professional welder where I work
give me some lessons during lunch that were especially helpful—you may want to
consider taking a class or seeking out a experienced hobbyist for some advice.
Practice is the single-best thing you can do to improve your weld quality—no
book or website can teach you what an afternoon of practice will.
· Control
the heat. Sheet metal will warp
very easily if you apply too much heat. With a MIG welder, most warping issues
are caused by welding too long a seam without taking the time to let the metal
cool. For reference, it usually takes me about an hour to weld a 12-inch seam
using the technique I’ll share with you below:
· Don’t
“chase” your holes. Inevitably,
you’ll blow through the metal as you weld. Your first instinct will be to try to
immediately fill the hole with more welding (and this will be a very hard
instinct to resist, I assure you). STOP! All you will do is make the
hole bigger. The area is already overheated, so adding more heat will only
create a bigger hole and little metal stalagmites hanging below the weld area.
Come back later and try to fill the holes with a series of quick spot welds
around their perimeter. If necessary, cut out the area and make another little
patch. Do not chase your holes. This is very important, so I’ll say it
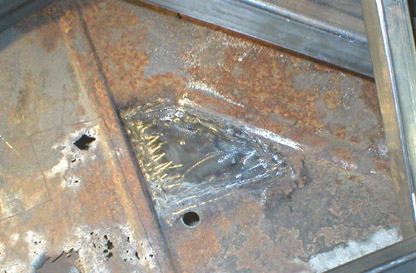
again: DO NOT CHASE YOUR HOLES. · Stop frequently to use a hammer and dolly. Keeping the two pieces of metal flat and even with each other is critical. As you weld, they may move around and distort. Use a hammer and dolly to keep everything properly aligned. If you are not familiar with hammer and dolly techniques, invest in some inexpensive tools and practice. It will become one of your most useful metalworking skills.
· Keep
your welding tip close to your work.
When I started welding, I tended to keep the
nozzle 3/4” or more away from the weld area. While this was adequate, I often
found that my welds tended to be too shallow, didn’t get full penetration and
were often contaminated and porous. To remedy this, I slowed the wire feed speed
on my welder and kept the nozzle extremely close (1/8”-1/4”) to the working
surface. Position the electrode, pull the trigger, and ZAP! the weld is
done. Move to the next area and repeat. Use only as much heat and speed as you
require to achieve adequate penetration. Any welding wire deposited on top of
that will only have to be ground off later, and welding wire is extremely
tough.
· Watch
what you’re doing.
You might be surprised by how many welders don’t watch what they’re doing and
allow the weld to just be “close enough” to the target area (I’m sure we have
all seen the guys on TV who close their eyes and pull the trigger). This is
especially true with MIG welders, where the large nozzle can partially obscure
your view of the weld pool. With a good welder’s helmet (and I emphasize
GOOD—invest in a high-quality name-brand helmet to protect your eyes), you
should be able to look right at the weld and see exactly what’s going on. I
learned to watch from the side so the nozzle doesn’t block my view.
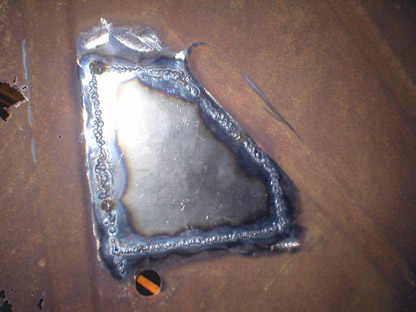
With everything pretty close to flat and flush, that’s the time to take your sanding disc and lightly finish grinding the area smooth. Evidence of the patch should be slight—some grooves and pockmarks where the weld wasn’t perfect are normal. Don’t worry about making it perfect with more welding. If you need to do some additional hammer and dolly work, do it now. Just don’t overdo it with the sanding disc, which can remove too much material very quickly and put a lot of heat into the patched area. If, for cosmetic reasons, you feel it is necessary to make the patched area perfect, you can always finish the patch with a little lead or plastic filler before you paint (this is the correct application for body filler). If you did your job well, the repair will be invisible and permanent after paint is applied and nobody will be able to spot it.
Remember that rust repair is a job you can handle. People have been doing it for decades, many of them no smarter or more talented than you. Restoring sheet metal can be frustrating and intimidating, but it is also very rewarding to see the finished results. You will also save a pile of money, even considering the purchase of new equipment. Professionals who specialize in this work are not cheap: once you see the labor required, you will easily understand why metalsmiths charge what they do and why professional restorations are so expensive. Next time we’ll talk about polishing stainless steel and aluminum trim, the chrome-plating process and getting your car’s bright work to shine like new. E-mail me at toolman8@sbcglobal.net This page accessed Thanks, Fidget! |