What's up with this
banner thing?
If
you don't see a navigation bar on the left, CLICK HERE
|
|
|
Spinning My Tires is one man's view of the world of cars. Random thoughts, ideas and comments pop up here, all of them related to owning, driving and restoring cars. I've been doing this car thing as long as I can remember, and have enjoyed a great many car-related experiences, some of which I hope to share with you here. And I always have an opinion one way or another. Enjoy. E-mails are welcomed--if you have thoughts of your own to share, please send them. Additional Spinning My Tires editorials can be found on the Archives page. 3/1/05 My Dream GaragePeople who aren’t car enthusiasts think I’m weird. I mean, really weird. Most recently, they’ve been struggling with the idea that I’m planning on buying a large chunk of land out in the country and building a garage on it before I build a house. Worse yet, their minds boggle at the idea that I plan to live in the garage while my house is being built. And to top it off, they’re stunned to hear that the garage will be nearly 1500 square feet. I must be a lunatic! Do you think I’m weird? You probably don't if you're a real car guy. I thought I’d share my dream garage with you, and perhaps you’ll pick up some tips that will work for you, too. I’ve studied garages and shop designs for years, and have packed a lot of innovative features into my design. I’ve also left out a lot of things that maybe a “dream garage” should have, usually for financial reasons, but some I decided I can just live without. I have a background in the construction trades and some architecture training, so a few years ago, I decided to design and build my own house. Julia and I have been collecting photos of houses we like, features that we want and spent a lot of time thinking about how we live. We have decided to build a timber frame house with soaring cathedral ceilings. It will be incredibly energy efficient (or "green"), heavily insulated and maybe even capable of operating “off the grid” if necessary (i.e. without need for external connections to electricity, water, phone, gas, etc.). So I spent a lot of hours designing our perfect house—all we’re looking for now is the perfect piece of land on which to plant it. I expect we’ll be ready to pull the trigger in two or three years and finally get started. While I was designing our dream house, I started thinking about my hobby. I started work on the house plans long before I owned the Buick, so the shop was a late addition. Initially, I tried adding a large attached garage (the house currently has a simple 2-car attached garage for daily drivers), but couldn’t justify adding the square footage my “dream shop” would require. So I started with a blank sheet of paper and designed what I consider the perfect free-standing shop for restoring old cars. It has work space, storage space and living space. The living space originally started as a simple office above the shop, but quickly grew to a small apartment when we talked about our plans for the entire build. We’re currently planning on buying the land, building the shop, then selling our current home and living in the shop while the new house is being built. We’ll see how that works out… You can click on the thumbnails to get a glimpse of what I’m talking about. These are all computer-generated renderings I made, but they’ll give you an idea of the space and configuration (thumbnails open in new window).
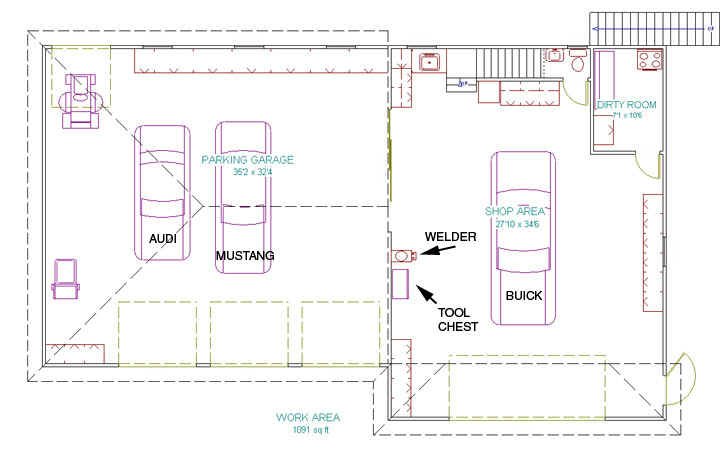
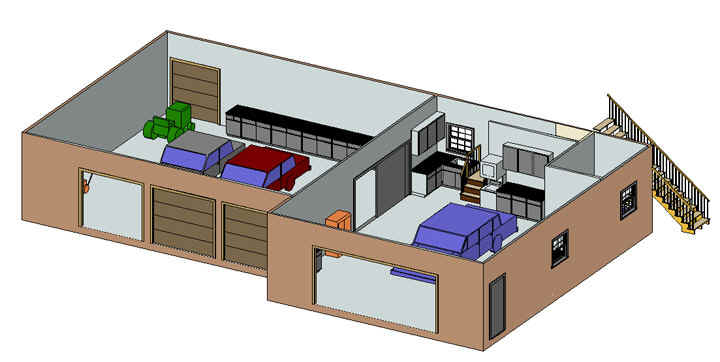
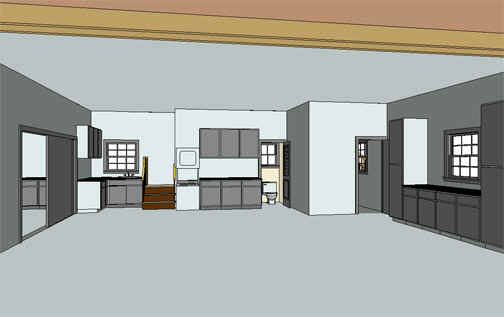
Here are some of the highlights: SIZE: The shop has to be big enough to work on a car and store a modest collection of cars that I may (or may not) acquire some day. Now I don’t plan on ever being able to afford a large collection nor do I want a museum full of cars I can’t use. No, my shop will hold up to 8 cars if I really pack ‘em in tight (someone, somewhere decided that 8 was the perfect size for a car collection). However, it's really designed for 3 cars, plus a large workshop area. In working on the Buick, I’ve found that a 2-car garage is about the ideal size for a body-off restoration, so my workshop area is about the size of a 2.5 car garage. I made it more than wide enough for two cars, and deep enough for plenty of room on all sides. With this workshop area, I can have a body and frame sitting side-by-side and be able to work on them without tripping over anything. There are workbenches along two of the walls, a bank of storage cabinets for towels and shop supplies, a spot for a roll-around tool chest, the welder and other equipment.
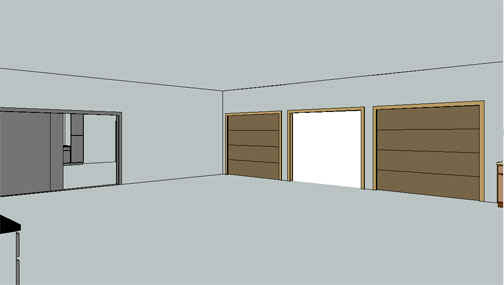
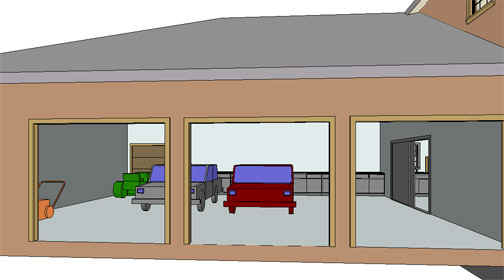
In the back corner, I have what I call a “dirty room” where I will house the bench grinder, the drill press, the blast cabinet, the powder coating station, the buffer and a workbench for doing work that is, well, dirty. Of course, there’s a window and an exhaust fan in there to keep the air moving, and a sealed door to keep the dirt out of the rest of the shop. After using the buffer in my garage and seeing what a mess it made of the entire place, there’s no way I’d work without a dirty room again. There’s also a small bathroom (actually just a toilet), because Julia doesn’t like me dragging dirt and grease through the house when I need to go—I’m sure you know how that goes. There’s a single man-door on the side of the workshop leading outside. The man-door is essential in winter to keep the garage warm—there’s no good reason to open a large overhead door to enter the building. You’ll also note on the first floor plan that the man door opens out instead of in. This is for two reasons: first, it will keep the door from crashing into anything inside the shop (which adds usable floor space), and second, if it opens out, a thief can’t kick it in to enter the building. Smart. The parking area is 3.5 bays wide, with each bay having its own door so I don’t have to open the whole place up to get a car out. Each of these parking bays is deep enough for two normal-sized cars if necessary. The half bay will be for garden equipment, which, of course, I’ll have to deal with in any house I build. I figured having the garden equipment out in my shop made more sense than trying to store it in the 2-car garage attached to the house. This half bay has its own door leading out the rear of the shop. The parking area is separated from both the workshop and garden storage area to keep dust and dirt out, though there is a large sliding door of some kind between the parking area and the workshop. I haven’t yet decided whether I want this door to be big enough to fit a car through.
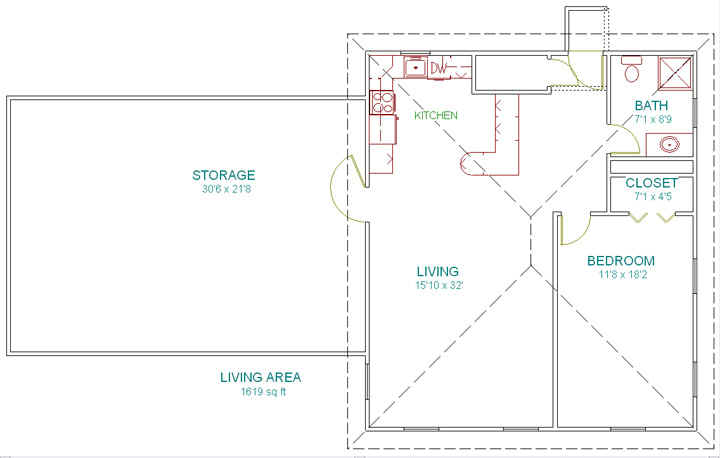
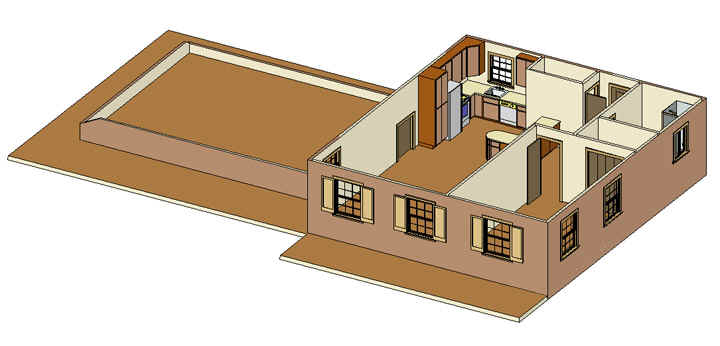
On the second floor, the area above the workshop area is a modest 1-bedroom apartment with a small kitchenette. Nothing amazing, but enough for me and Julia to live in for a few months while the main house is being built. After that, it could be a great guest suite or even a rental, who knows? This area has its own entry via a stairway at the back of the building so that the shop can be secured should the apartment ever be rented. The space above the parking area will be an attic exclusively for storing parts and equipment. It will be accessible by its own drop-down stairway from the parking area so that I don’t have to drag dirty parts through the apartment. I may include a dumbwaiter or some sort of pulley system for lifting large parts into the attic. The shop area will have ten-foot ceilings so I can use the rotisserie as intended (though the parking area will have standard 7- or 8-foot ceilings). At this point, you’re probably asking yourself why I don’t have plans for an overhead lift. For one, it’s an expensive tool. It also requires more than 10 feet of clearance (consider that the Buick is taller than Julia’s 5’2”, and you can see how impractical it would be). Finally, I’ve never used a lift and prefer to work with the car at a lower height—I will probably have some sort of low-level lift that is mobile so I can get it out of the way when not in use. I also thought of a pit, but the foundation and trenching issues, not to mention the limited use, made it seem silly. No, a small, portable lift will suit me just fine. HVAC: Having a heated garage is not a luxury in Ohio, it’s a necessity if you want to do anything during the winter months (and there are usually at least 5 of them every year). My dream shop will utilize the same heat source that my dream house will: radiant floor heating. Plastic or copper tubing is cast into the concrete slab and hot water circulates through it, warming the entire slab. The heat is even and dry and since it comes from the floor, it heats the low-level spaces where you live instead of blowing hot air up into the ceiling. Radiant floor heating is also extremely efficient—once the slab is heated, it doesn’t take much energy to keep it warm. I plan to use geo-thermal heat, which should keep the water around 57 degrees year-round without any outside energy. It’ll make the floor nice and cool in the summer, too. When I need more heat, I have included a small gas-fired boiler to assist. The building has three zones: workshop, living space and parking area, which can each be maintained at different temperatures. The walls are also constructed using 2x6 studs instead of 2x4s (this upgrade adds less than 4% to the build cost) so I can add more insulation in the walls. There are only a few windows in the shop/parking areas, both for security and for insulation reasons. I can’t bring myself to install air-conditioning in the garage, however. In Ohio, we don’t get that many 90+ degree days in the summer, so it’s definitely a luxury I can live without. But I will install ceiling fans in the workshop area to help move the air around. I do not want fans in the parking area because all they’ll do is circulate dust around the cars. That area is for parking and light work only. FLOOR: The floors are concrete slabs with a smooth finish. They’ll be painted with white Rustoleum epoxy, the same stuff they use in airplane hangars, not that cheap Home Depot crap that peels off when you turn your tires. We used it where I used to build race cars, and it was amazing—nothing stuck to it, it was easy to clean with a rag or mop, and it reflected light, making the shop extremely bright. Those fancy tiles and mats are an unnecessary expense that don’t do anyone any good in my shop. There are floor drains in each of the bays to facilitate washing the floor and draining off melting snow from the vehicles parked inside. I thought about a dedicated “car wash” bay, but decided against it. I have hot water, so I can wash the car outside, then bring it back into the heated garage to dry it and detail it if necessary. Remember I’m aiming for maximum practicality at minimum cost… LIGHTING: All areas will be lit by banks of fluorescent lamps. I know there are better light sources, but I’m not made of money—I am trying to build this on a budget. Fluorescent lights are cheap, durable, bright and relatively energy-efficient. I’ll be installing about a third more than required, just to make sure. You can’t have too much light. Workbenches will have their own overhead spots to throw additional light on close work areas. Finally, I will install floodlights in the floor of the workshop. Yes, in the floor. Heavy-duty light cans with thick glass lenses that fit flush with the floor will provide light underneath whatever I’m working on. No more drop-lights or trying to move flashlights around. Lots of light under the car, right where I need it. POWER & AIR There will be 120V, 20A, grounded, GFCI-protected outlets every 4 feet in the workshop area and every 10 feet in the parking area. They will be located 5 feet off the ground to make plugging in easy. All the wiring will be in conduit outside the walls to make additions and changes easy. There will be additional covered outlets in the floor adjacent to the light fixtures, as well as several in the ceiling to power garage door openers and drop-down reel lights. I use my current ceiling outlets all the time, and find them very useful. All wiring is 12-gauge for heavy loads. There will be 220V outlets in several strategic locations around the workshop area to power a welder or other heavy-duty electrical device. The air compressor will be located under the stairs next to the bathroom in its own sound-proof room. I’ll probably add a cold-air inlet and a dedicated drain for the compressor as well. Air lines will extend around the perimeter of the entire shop, with drops every 10 feet and on every wall. I’ve seen some of those plastic hose systems that look easy to assemble, but they seem expensive. Right now I’m planning on using good old galvanized pipe, but perhaps I’ll find something better in the mean time. We used stainless steel tubing and Swagelok fittings at the race shop—that stuff was like sculpture (and cost twice as much)! Maybe galvanized tubing with the Swagelok fittings would be an economical alternative...? The shop will be wired for stereo sound with built-in ceiling speakers (my current house is fully wired for sound, and it’s a real luxury!). There will be several phone jacks as well as computer network connections throughout the shop area. An intercom system to the main house is probably necessary as well. There is a hot-water tank located adjacent to the air compressor under the stairs. There’s a sink in the corner next to the stairs and a utility sink in the parking area, as well as the plumbing for the toilet and the kitchenette and bathroom in the apartment on the second floor. There are also several hose spigots outside the building to feed sprinklers or for washing the car. There is also a washer/dryer combination for washing towels. Julia is sick of me using her in-house equipment because her clothes get all "waxy" when I wash my car towels. STORAGE: A lot of guys like to spend a fortune on custom cabinetry in their garages—there are whole industries built around high-end garage cabinets. And while I’d like to say that’s what I’ll be using, it just isn’t in the budget. Instead, I’ll be using inexpensive cabinets and countertops from a home-improvement store. The cabinets will be mounted on the walls and placed about 5 inches off the floor to prevent dirt and water from collecting underneath. This will make hosing down the floor a snap. This is also one less place for animals to hide and build nests. I’ll probably build my own workbenches where I need them and use galvanized sheet metal to make my own work surfaces. It's easy enough to do. BUDGET: After doing some research and based on my experience, I believe I can build this shop for under $25,000. Yeah, it’s still a lot of money. But it’ll be part of a larger mortgage for the house, so ultimately, it’ll cost right about 10% of the entire nut—relatively affordable. Of course, I’ll be doing a lot of the hard work myself, including the electrical, plumbing, drywall, siding, roofing, etc., so it’ll take longer. That’s what our hobby is about, isn’t it? Trading time for money. Besides, there’s no set schedule, no time limit on the project. We’re looking for the land, and once we find it, I’ll get started on the shop. It’ll take me 6 or 9 months to build, but that won’t be a problem. Like I said—I’ve got the time, and it’s worth it to me to do it exactly the way I want. I hope you’ve found at least a few ideas for your own shop here, and I’m open to suggestions. If there’s something you really find useful that I’ve omitted, please let me know. Right now this is just a dream, so it doesn’t hurt to dream big! See you next month! E-mail me at toolman8@sbcglobal.net This page accessed Thanks, Fidget! |