What's up with this
banner thing?
If
you don't see a navigation bar on the left, CLICK HERE
|
|
|
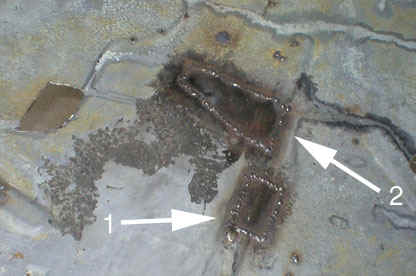
May 1, 2005 Misc. Trunk PatchesI'll be honest—I'm really sick of working on the trunk of this Buick. It's been more than 6 months of patching, cutting, fabricating and welding. But I can see the home stretch now, and over the past two days I finished many of the patches that were standing between me and finishing this part of the restoration. I also want to renew my endorsement of "Twenty Gauge" welding wire, without which most of these patches would not have turned out as nicely as they have. My welds have improved tangibly, the stuff is worlds easier to grind and I can use a hotter spark to get a flatter weld, better penetration and less build up. There's really no drawback that I can see. Use it. Anyway, with the body mount finished, I started on some of those areas that were heavily perforated by rust. Sandblasting revealed most of them, but some are the result of too much grinding on earlier welds, making the surrounding sheet metal too thin. So it had to be cut out, a new patch fabricated and welded in, then ground to match the surrounding steel. Nothing new or earth-shaking for you to see, but here it is anyway. The first patch was one that overlapped a portion of an earlier patch—the one that bisected one of the stiffening beads on the trunk floor. Too much grinding burned through the sheet metal, so I cut out the thin stuff and spliced in a patch. The second patch was right above it and was simply rust perforation. There were four or five holes near each other, so I decided to make one big patch instead of four or five little ones. Sometimes perforation will cooperate and leave me enough steel so that I can just weld the holes closed using a copper spoon, but none of these were strong enough to do that. So I cut it all out and welded in a second patch.
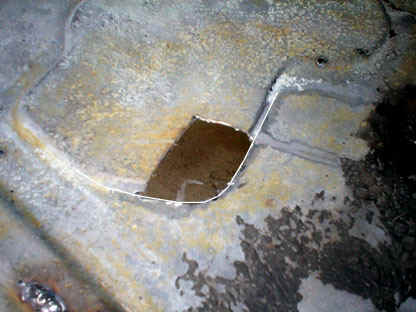
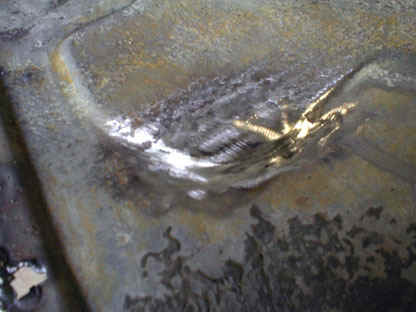
The third patch was a little more difficult. The perforation at this point was right on the corner of a raised area, so the patch not only had to cover the perforation, but had to incorporate a rounded edge that would continue the stamped area from the original panel. I cut the steel to shape, making it a little larger than the opening knowing that I would have to stretch and hammer on it a little. It is more important to get the corner correct, then trim the patch to size. This prevents the patch from being undersized and allows for a perfect fit.
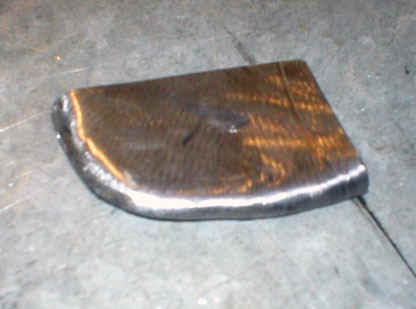
I hammered the patch using a curved portion of my bench vise, tapping it a little, moving it, tapping, moving, etc. I've had a lot of success making curved patches because I don't try to move all the metal in one or two hits. I've found that a lot of little taps are a lot more effective when trying to get metal to stretch.
Happy with the fit, I tacked the patch into position. You can better see how the panel is shaped in the photos below:
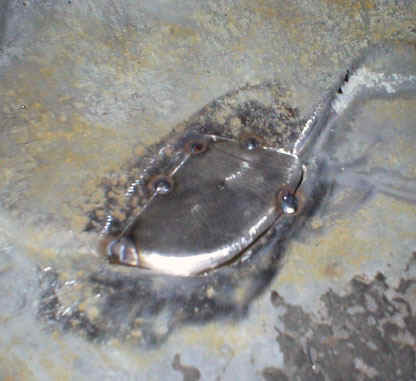
Then I used my cut-off wheel to grind the welds down close to the surface. The critical thing here, especially with the potentially very thin trunk metal, is not to go too far. That's been my problem all along—I expected to be able to just grind everything flush and have it disappear. Well, even the pros have a hard time achieving that (not that I shouldn't keep aiming high), and I've learned to stop grinding before I go too far. I leave a small bit of weld bead protruding, then finish the whole area with a 120-grit (I don't use the 36-grit discs for finishing any more) sanding disc on my die grinder. The repairs aren't flawless, but they aren't thin, either. Flawless is what the lead is for (that'll be the next step).
The last thing I did was spend a few minutes with my heavy shot-filled rubber mallet pounding the floor flat. The accident that wrinkled the floor did a lot of damage, and the only way to get it to lay flat is with brute force. This is one place where light taps weren't doing me any good. The mallet is very good at getting these large expanses of steel to lay flat. Most areas had been buckled upwards, so it was a simple matter to pound them down. The few dents that were downward, I climbed under the car and hammered them up. I also used the rounded end of one of my body hammers to reshape the rear corners of the trunk floor where it curves up over the axle. With a little patience, I was able to get it looking very nice. A little fine-tuning with a hammer and dolly (and a buddy, because my arms aren't long enough to reach under the trunk and hit it from above with a hammer) will make it perfect. Previous
Restoration Day E-mail me at toolman8@sbcglobal.net This page accessed Thanks, Fidget! |