What's up with this
banner thing?
If
you don't see a navigation bar on the left, CLICK HERE
|
|
|
May
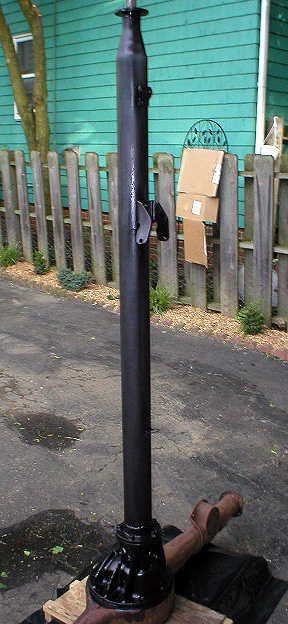
24, 2004 Painting the Torque Tube Part 2Observation of the day: cleaning a paint gun is a major pain in the neck. Today I decided to finish painting the torque tube. Since the last installment, I coated the torque tube with a second coat of black Zero-Rust to cover the orange and provide the proper thickness. I took some photos, but later read in Bill Anderson's 1941 Buick Fact Book that the torque tube and pinion carrier are supposed to be gloss black, not semi-gloss. Drat, and me without any gloss black Zero-Rust (in fact, they don't make a gloss black, just a glossy clear coat to put over the satin black). So I thought I was finished, but I wasn't. Instead, I used the gloss black Rustoleum epoxy I used on my buffing stand. Between the two coats of Zero-Rust and the epoxy, I think this torque tube will be plenty durable and have a high-gloss finish as original. An extra coat of paint would also add some more protection.
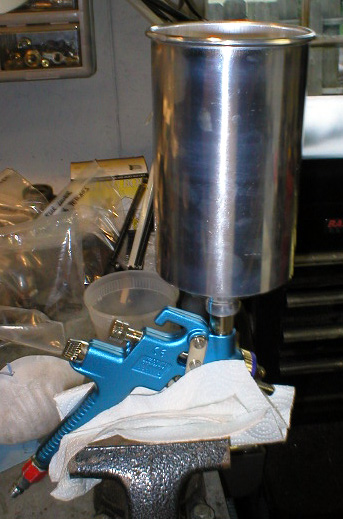
I took some 220 grit sandpaper and a flexible block and sanded down the black Zero-Rust to get a good surface, then wiped it down with wax and grease remover and blew it off with the air gun. Then I got out my new SATA paint gun that Julia bought me last Christmas and filled it with the Rustoleum epoxy. After trying several different settings on the gun and spraying some test panels on a piece of cardboard, I got it pretty smooth. It would still spit a bit, but I attribute this to the thick paint rather than the gun settings. I added some thinner which seemed to help slightly.
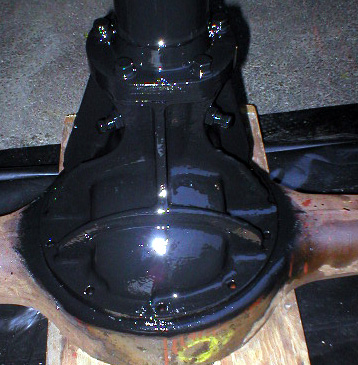
My first few passes left a rough texture because of the spattering of the gun. I ended up spraying it on pretty thick so that the flow properties of the paint would even out the rough spots and give me a smooth finish. That technique ended up working pretty well, though I know I have to experiment a little more with the gun and the paint viscosity before I try to paint the body or anything visible. Once I got going, the painting became easier, and I learned how and where to hold the gun to get the best coverage. I didn't use much paint (about a cup or so), but I did get good coverage. It probably would have been easier to spray over the orange Zero-Rust instead of the black, but the difference in gloss made it possible to see where I had coverage and where I didn't. Satisfied that I had adequately covered the entire assembly, I rolled it back into the garage and started cleaning the gun. And man, what a pain cleaning this gun is! I officially hate painting because of it. I filled the cup with thinner after dumping the remaining paint back into the can and sprayed it through the gun into a trash can filled with newspaper. That did a decent job of cleaning it out, but the instructions also say to disassemble the gun and clean each part. So that's what I did. I dumped a little thinner into a large tub and placed each of the pieces I removed into the thinner. Then I used air to blow out the gun and wiped it down with paper towels. It seems to me that you can never get all the residue off our out of the gun because of all the nooks and crannies. I wiped down each part and dried them off, then reassembled the gun. Once it was reassembled, I ran more air through it to thoroughly clear the passages. That whole process only took about an hour (note the sarcasm). If there's a worse job than cleaning this thing, I wonder what it is... I smell like thinner, my clothes smell like thinner, there's thinner all over my work bench, there's a pile of thinner-soaked paper towels in the trash, and my latex gloves continue to melt each time I touch the stuff. And I have to do this every single time I use this thing. Great. I will say, however, that the results are pretty nice. The photo below makes the paint look kind of ashy and gray, but it is actually a very smooth, rich, dark, shiny black, perfect for this assembly. Once it dries, it should be quite durable. Another part to put on the shelf to await reassembly. In the mean time, I'll be sending the main axle housing to the powdercoater with the frame to get sandblasted followed by a semi-gloss powdercoat.
For a restoration, I think it's a good idea to mix up the shades of black you use, even if you aren't following a strict guide as I am. Not only does it add visual interest to the engine compartment and chassis because of the variations, but it is likely more accurate, since each part was painted at a different time from a different batch of paint, often at different facilities by different companies. There's no way all the black parts on your car matched when it was new--why restore it that way? It'll look so much more accurate and attractive if you mix up the contrasts a little bit.
My sheetmetal for the trunk repairs should arrive in the next day or two. I ended up buying a 4x8 sheet of 18 gauge steel, since it was only $7.00 more expensive than the 24x36 piece I requested. I'll have the guys at the shop cut it up into smaller pieces so I can carry it home in the Protege5. This coming Friday I have an open track session at Nelson's Ledges Raceway with my Mustang, and this weekend, I'm installing six new windows in our master bedroom, so I probably won't get much done on the car until next week. Previous
Restoration Day E-mail me at toolman8@sbcglobal.net This page accessed Thanks, Fidget! |