What's up with this
banner thing?
If
you don't see a navigation bar on the left, CLICK HERE
|
|
|
Amateur
Auto Restoration
Part
Four: During assembly, your vintage car used parts made in separate factories and built days or even weeks or months apart. In addition, each component was designed to operate in a specific environment: the gauges in the dashboard are subject to much different conditions than the shock absorbers on the chassis. Because of this, automakers developed specific coatings, paints and treatments to protect most parts and still provide an acceptable appearance. As restorers, we must strive to replicate these coatings as accurately as possible, but in many cases, we can also benefit from decades of technology to make our old cars at least as well-protected and durable as new cars without affecting their appearance. I would be remiss if I did not mention that there is some debate among restorers as to the “correctness” of using modern materials in the restoration of an old car. As far as I can tell, there is no definitive answer. My opinion (and that’s all it is) is that modern materials may be used if they cannot easily be distinguished from original. Some purists may insist on authentic materials, and that’s a position I certainly understand and respect. However, it’s important to remember that all judging is subjective and that most restored cars are, by definition, much nicer than they were originally. For instance, even the best NOS ‘40s chrome bumper would be laughed off the show field despite being 100% original and authentic. Some experts may be able to tell the difference between lacquer, enamel and urethane paints, but there is no penalty for using the urethane and it will be far more durable in the long run. Use your best judgment and check your research carefully. Some of the most frequent questions I receive are about powder coating: What is it? How is it done? What are the benefits and drawbacks? How much does it cost? This is but one recent technology available to the amateur restorer that will significantly improve the durability and longevity of a restoration without adversely affecting its appearance or accuracy. This article is dedicated to coatings that can help protect your vehicle’s individual components once you’ve cleaned them up. Following my practice of restoring each part as it comes off the car, a working familiarity with the various processes, materials and techniques can be essential to the amateur restorer. However, because of the scope and size of this article, we’ll talk about sheet metal and finish body painting in a later article. In Auto Restoration for Amateurs, Part 3, we discussed stripping parts and preparing the surface to be refinished, so in this article, I’ll assume that you are starting from clean, bare metal that is free of oils, grease, tar, paint and other coatings. Unfortunately, this stripped state leaves metal vulnerable to corrosion, which can happen almost immediately in humid climates or if parts are handled with bare hands. Your primary mission after stripping your parts is to protect them; it makes no difference whether they will be going into storage until they can be finished en masse, or if you will be finishing them immediately. Fortunately, the steps you will use are cumulative and if you are careful and smart, rarely does one step have to be “undone” to proceed with the next. Instead, you should think of each step as a part of the entire process, another link in the chain between the base metal and the finish coat. My first step is always some sort of degreaser or “metal prep” solution. No matter what processes you used to clean and strip your parts, there will be some residue (sand, chemicals, soap, etc.), so the minimum you should do is blow it off with compressed air and wipe it down with a quality degreaser or solvent, preferably one designed for a body-shop environment. I usually follow that with a product called Picklex-20, which etches the metal to prepare it for subsequent finishes and leaves a coating to protect bare metal from moisture in the air. With Picklex-20, bare metal will stay rust-free if stored out of direct contact with water—I used it on the doors of the Century after I stripped them of paint and 15 months later they’re still bright silver metal. In addition, you can weld through it (there is evidence that Picklex-20 improves weld strength and penetration), paint over it and even powder coat it. I’m sure there are similar solutions available from major body shop suppliers and I highly recommend using one of them immediately after stripping your parts so you only have to do it once. (As an aside, I don’t usually endorse products or tell people what to use in their own restorations, but this is as close as I will come to it: Picklex-20 works as claimed.) After your metal is prepped, you will have some decisions to make. When most vintage cars were built, everything on them was either painted or plated, so those are the finishes you should strive to reproduce. During disassembly, you should have taken note of each part’s color and even its level of gloss. Refer to your notes and photographs to determine each part’s proper finish. If your parts were originally plated, you have several options. Most silver-colored parts were cadmium plated (commonly called “tin plating”). Black-plated parts were either oil-dipped or treated to a process called black oxide in which the parts were dipped in a boiling solution that would bake on the black finish to prevent corrosion. As you probably noticed when you disassembled your car, these coatings met with varying degrees of success in fighting rust. Modern plating shops can reproduce these original finishes as long as you tell them what your goals are. Make sure they understand that these are not industrial parts to be plated in bulk, but parts for a restoration. Knowing that, they will clean and plate the parts more carefully (if they’re good), and you’ll get a finish that closely resembles the original. Cadmium plating is becoming less common, more hazardous and expensive, so many platers are using zinc instead. Don’t worry, the zinc finish looks awfully close to original and provides adequate protection. True black oxide is a highly specialized and dangerous process, but there are more benign substitutes that are readily available. Ask around or look into a home kit from Eastwood or Caswell Plating that will allow you to approximate these finishes in small batches. I have used these home kits with some success and have found that like all things in restoration, your prep work will determine the final result. If you try a home plating kit, such as those from Eastwood or Caswell, follow the directions carefully and expect to need some practice to get it right.
The remaining parts on your car were probably painted. Perhaps they were painted individually or as an assembly; that’s up to you to determine. Some restorers prefer to duplicate the factory techniques when painting—overspray on adjoining assemblies, painting the entire assembly after it is together, etc. Others prefer the hyper-detailed look of painting each part individually and then assembling them. I’ll leave that decision to you. The only thing you should be aware of is that plated or powder coated parts should be fully disassembled for finish coating. These processes are not tolerant of assemblies that require movement. Speaking of powder coating, I have found that it is the ideal solution for a collector car’s painted chassis components. Anything that was originally painted can be powder coated and will appear virtually indistinguishable from a painted part. If a part can withstand the curing temperatures powder coating requires, it can be protected forever. Modern powders are available in an almost infinite choice of colors, finishes and textures, just like paint. Some advanced shops can even do color matching, so you don’t have to worry about being limited in your selection of colors for an authentic restoration. You’ll also find that the cost of professional powder coating is quite reasonable, even compared to painting.
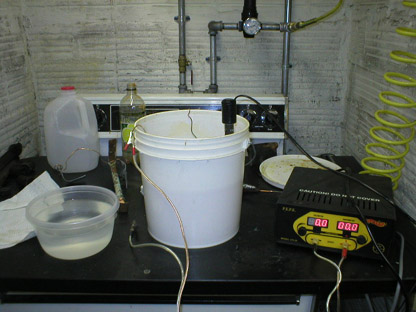
Powder coating is just that: a fine powder made up of polyester and nylon resins is sprayed onto the bare metal part. The process uses a slight electrical charge to attract the powder to the part, reducing overspray and helping to get adequate coverage in tight corners. Once the part is sufficiently coated, it is baked in an oven where the resins melt and become liquid, flowing together to form a durable, impermeable coating that’s much tougher than paint. It is highly flexible, resistant to chips and impacts and because it melted into all the nooks of the part, practically impossible to peel off. It can be top-coated with additional layers for durability or gloss or special effects like pearls, metallics or clears. The best part of powder coating is that it produces no dangerous fumes, requires no special equipment beyond the powder coating gun and an old electric oven, and clean-up is with a broom or vacuum cleaner. Once the parts have cooled, they are ready to be used. You can even sand, buff and wax powder coatings to achieve a glass-smooth finish just like the best paint. There are a few drawbacks to powder coating. The most common would be chip repairs. Though powder is vastly more durable than paint, a “touch-up” probably requires removing the part, cleaning it, re-spraying the powder and baking it again. I would argue that the pampered lives that restored cars lead probably makes chips less likely, but even if you use your car regularly, the powder will easily outlast any paint you can apply. Another potential problem is the curing temperature—if you aren’t sure whether a part will withstand the heat of curing, then don’t take a chance with it. Excessive heat can warp and distort metal parts, and some forged or heat-treated parts can have their temper altered by baking them. The good news is that modern powders cure at intermediate temperatures (300-400° F), so the risk of heat damage to any metal part used on an old car is remote at best.
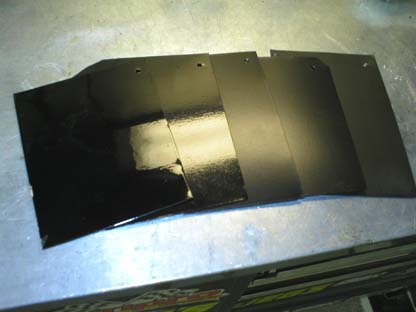
I have a home powder coating system, and I couldn’t be happier with it. I bought a used electric oven for $50 and I was in business for a total investment of less than $200. It is my plan to powder coat every painted component on my Century except the body. I have a collection of powders in several different shades to duplicate factory colors (a bluish-gray for forged suspension members, a dark gray for cast iron parts, and five different blacks with varying degrees of gloss), and have applied it to everything from brake drums to sway bars. I will be having a professional shop powder coat larger components such as the frame, differential and even the engine block and head! (Note that cured powder is more resistant to heat than the granular powder—although it melted initially at 300° F, once it is cured, powder will withstand temperatures several hundred degrees hotter.) And to even the most discriminating judges, it should look original.
If you prefer to use paint in your restoration, you will still have to educate yourself a little bit. Some paints require primer, some do not. Some go on thick while others work best with several thin coats. Most spray-can paints are lacquer or enamel, which are not exactly modern technology, and you should be aware of compatibility issues. In any case, read all instructions and data sheets carefully before applying a finish. More recent paint technologies, including some infamous “paint over rust” paints, contain chemicals that can cause long-term injury to your lungs and skin. Please use adequate protection. Think of it this way: when you’re in the hospital suffering from lung damage, imagine how angry you will feel if you knew you could have avoided it by using a $40 respirator. Be smart and protect yourself. For the undercarriage of your car, ordinary spray paints are adequate. Eastwood offers a selection of colors that will accurately duplicate factory finishes. Remember that several thin layers are better than one thick one and that surface preparation is always the key to success in the final finish and you’ll be fine. These paints will not be as durable or corrosion resistant as powder coating or urethane paint, but for a show car or one that is seldom driven, it is probably not an issue. After all, the car survived for decades with the original stuff on it. You can also use more advanced urethane paints. Urethanes typically require a primer as a first coat, and I usually recommend using an epoxy primer for maximum rust protection and durability. Urethane paints are also a type of polymer that, when fully cured, will provide considerable impact and chip resistance as well as reasonable heat tolerance. For this reason, you can use it without fear on items like brake drums and many engine components, though it will probably burn off of exhaust ports and manifolds. Urethanes come in single-stage and multi-stage varieties. Single-stage paints are just that: one can of paint to purchase and apply. Multi-stage paints are the basecoat/clearcoat systems. The initial “base” coat is for color, and it is usually fairly dull and lifeless when applied. The clear supplies the gloss, depth and shine that make a paint job spectacular. When applied within a specific time frame, the two layers chemically link together to form a tough finish coating that needs very little buffing or sanding to look amazing and will last years with minimal care. We’ll talk more about these paints in an upcoming installment on paint & body work. There are many different brands and manufacturers of urethane paints, and they typically require specialized equipment to apply (state-of-the-art paint guns can cost as much as $1000!). These paints also contain isocyanates (root word: cyanide), which can be deadly even in very small doses, so you will want to use a supplied-air breathing apparatus when applying them. Again, invest in safety up front or regret it later. Read the technical sheets provided with the paints—they’re free for the asking!—to determine the level of protection you are going to need. Doesn’t this make powder coating look a lot more attractive? I do not think a discussion of protective coatings would be complete without also addressing the increasingly popular “paint over rust” paints that have come to market in the past 5-10 years. While many purport to be “miracle cures” for rusty parts, the bottom line is that they are temporary solutions at best unless the part is thoroughly prepared before painting. This isn’t to say that these coatings do not have a place in a restoration—they do—but I feel that it should be clear that painting over anything but clean, dry metal will result in less than satisfying results. These paints use a variety of different formulations and ingredients; some are poisonous and give off hazardous fumes, while others are equally durable but less dangerous. Educate yourself and read labels—it’s important! Most so-called “miracle” paints are moisture-cured urethanes: moisture and humidity are part of the chemical reaction that helps the paint harden and cure. This is contrary to what most of us think of when we think of paint—usually we let painted parts “air dry.” This moisture-curing feature of these paints makes them very appropriate for rusty areas that will see additional water exposure. The problem is that while these paints have outstanding film strength (the ability to form a cohesive sheet of material when cured), they don’t have great adhesion properties. This is why they are best suited to rusty parts; the nooks and crannies formed by the rust give the paint “teeth” to hold on to. Applying these paints to smooth metal can result in the paint lifting off the surface in large sheets (film strength, remember?). And as urethanes, some of them have some nasty ingredients, so protect yourself properly. I limit the use of these paints to non-cosmetic areas such as floorboards, inner fenders, firewalls and other areas where appearance isn’t critical. They’re great to spray inside rocker panels, doors and deck lids where the surface may be imperfect but ultimately hidden from view. If the metal is excessively rusty, I would encourage you to repair it properly instead of using these paints to merely cover the rust. At least use a sandblaster or ScotchBrite pad to rough up the surface so that the paint will stick and stay stuck. As always, your prep work will determine the results you achieve. Follow all directions carefully, and any of these products will produce excellent results as long as they are used as intended. Next time we’ll talk about how to properly repair rusted sheet metal that is too far gone to simply strip and repaint. E-mail me at toolman8@sbcglobal.net This page accessed Thanks, Fidget! |