What's up with this
banner thing?
If
you don't see a navigation bar on the left, CLICK HERE
|
|
|
January
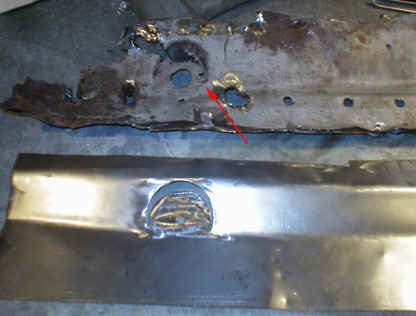
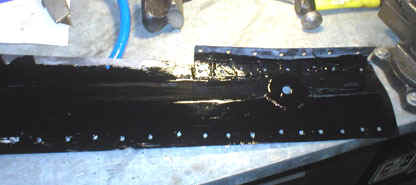
2, 2005 Trunk Work Part 15OK, my New Year's resolution: no more predicting when things will be done or how long they'll take. As usual, I underestimated how long this portion of the project would take, and all I managed to do today was get the passenger's side trunk all but welded together. It'll take at least one more day to get the driver's side to the same point. My filler panel needed some fine tuning before it would be ready to weld into place. The original panel had a depressed circular area around the body mounting bolt hole designed for a fender washer. I decided that since this was an important structural element of the car, the replacement panel should probably be done the same way. Looking at the hack work on the driver's side of the trunk, it's clear that not many people go to the effort of duplicating this feature. Fortunately, it was pretty easy to do.
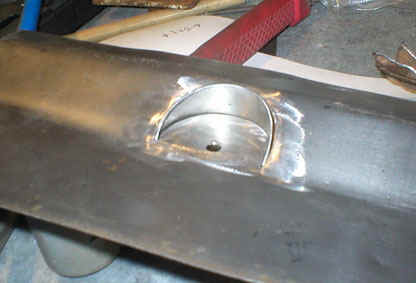
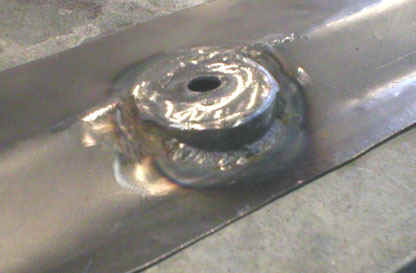
My first thought was to try to heat the metal and stretch it into shape, but I ultimately decided that it would never turn out right. Instead, I made the recessed area by drilling out 3/4 of the area with a hole saw. Then I made a small piece that would fit in the cresent-shaped area and form the walls of the depressed area and weld it into place. And since it was going to have a lot of pressure on it, I cut out a second metal disc using the same hole saw and made the bottom of the depression two layers thick so the bolt wouldn't be able to pull through. Again, perhaps it is overkill, but I only want to do this once.
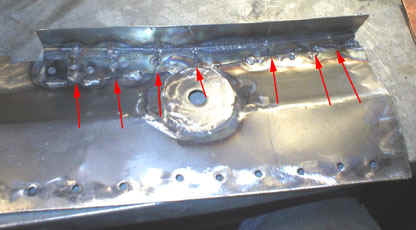
The next part of this brace that needed attention was the rear flange where it meets the quarter panel below the taillight. The original part was a large stamping that curled around the rear brace and was spot-welded to the quarter panel along a flanged edge. Again, I don't have the tools to create such an elaborate part, so I made the flange separately and welded it to the filler panel. I cut a strip of 20-gauge, folded it 90 degrees to create the flange that will be welded to the quarter panel, then sliced some pie-cuts into it to allow the metal to follow the contours of the rear quarter panel. I held it in place and adjusted the fit by hand, then clamped it in place so it fit tight. Then I laid the filler panel over it and tacked the two together so that the flange was tight to the quarter panel. Once I was certain it was in the right location, I removed the parts and finish-welded the flange to the filler panel. I ran a constant bead along the visible side and ground it flush to make a clean corner that would look like one piece of metal inside the trunk. Underneath, I tacked the pie cuts together and spot-welded them in several places to keep them flat against the filler panel. Then I drilled some holes along both sides of the filler panel to serve as spot-welds for securing the entire assembly to the brace inside the trunk, just like the factory did it.
The last step was to apply more black Zero-Rust to the bottom of the panel and inside the body brace area. This area will be completely inaccessible in the future, so I felt that it was important to protect the steel now, especially the welded areas where there is some overlap. The heat of spot-welding won't burn off too much of the Zero-Rust from the bottom of the filler panel, and when I have the body sandblasted, they won't be able to get inside this area. This is the last line of protection I have for this very vulnerable area, and my last opportunity to apply it.
Before I weld this panel in place, I'm going to fabricate the piece for the other side, using this one as a guide. I hope that I can fabricate the next one faster than this one (9 hours!) and get this trunk area finished up once and for all. I'm really sick of working on this trunk repair project. Previous Restoration Day E-mail me at toolman8@sbcglobal.net This page accessed Thanks, Fidget! |