What's up with this
banner thing?
If
you don't see a navigation bar on the left, CLICK HERE
|
|
|
March
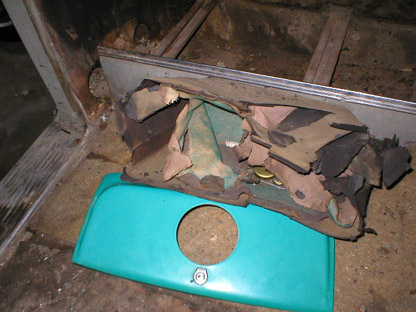
1, 2003 More Interior Removal & Stripping the EngineI got a lot done yesterday, and wanted to finish with the interior today. I still had to remove the glove box and the center stack that houses the radio and accessory switches. I would like to remove the dashboard and wiring as soon as possible, as well, so I can get the dash out for woodgraining and get the body ready to be removed from the frame. The first thing I did was remove the clock from the glovebox door. I have a Borg clock, though a Jaeger clock was also available. I don't know which, if either, is a better unit, but I'm planning on having this one converted to quartz operation. Doug Seybold says they have a conversion that will make the clock run on a watch battery so you don't have to worry about resetting it every time you disconnect the battery. Sounds like a good idea to me. Getting the glovebox apart really wasn't difficult--it came out without any problems. The actual "box" portion of it was pretty well rotted (it's just cardboard, after all), but there were no signs of water damage, which I take as a good sign. With the glovebox lid removed and the box out of the way, I could also get a good look at the defroster and firewall, not to mention the dashboard under the windshield where I suspected a water leak. Everything looked pretty good, actually.
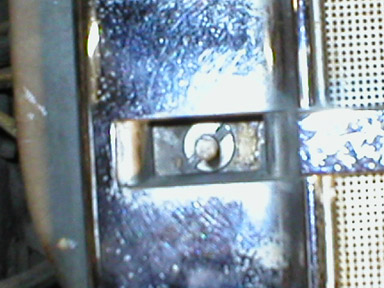
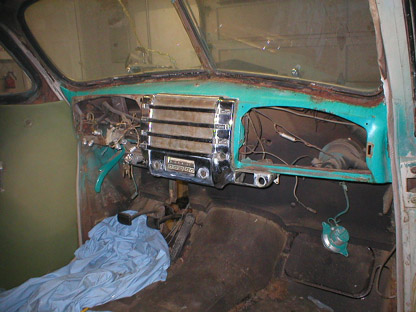
With that out of the way, it was time for the center stack. I felt around behind the dash for its mounting screws and found six of them, all of which I removed. I also removed the ashtrays, the radio knobs and retaining nuts, and disconnected the fresh air vent linkage from the passenger's side. Then I pulled out each button and removed it using an Allen key to loosen the set screws holding them to the switch shafts. With those out of the way, I could see how the switches were held in place:
Basically, it's a slotted nut that holds the switch in from behind. I'll have to find or make a tool to remove them properly so I don't damage them by trying to pry them out with a screwdriver or something. Frustrating, though. There was still one item to remove, and that was the ignition switch. It has three positions: Lock, Off and On (obviously). The Off and On positions don't require the key, so you can just flip it on and drive away. The Lock position requires a key, of which I fortunately have two. To remove the switch, you need both the key (so you can move the switch to the Lock position) and a pin to stick into the hole next to the key slot. This releases the outer bezel of the key slot from the switch itself behind the dash. No problem, I think and get the keys and a paper clip to put into the hole. Problem. My keys are too worn out to move the switch to the Lock position. I try both keys, and neither will move the lock. Nuts! I wrestle with it for about a half hour, and ultimately gave up. I'm going to see if perhaps a locksmith can make a new key for me from old records (I've heard of this happening). Nick Seybold (Doug's son and all-around nice guy) says that Buick only made a few different keys, so they might have a spare that would fit my car. It might be worth a try.
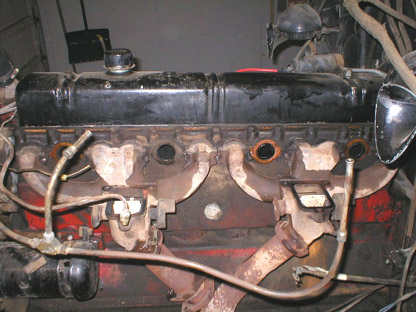
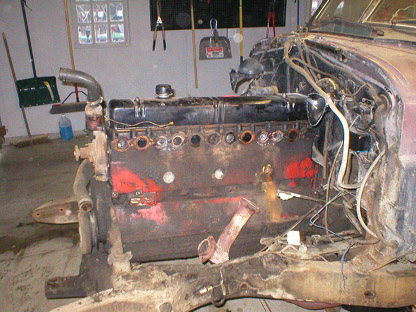
Frustrated with the interior, I decided to start stripping the engine in preparation for removal. I also wanted to put the carburetors into storage so they wouldn't deteriorate or get damaged. I just had them rebuilt, after all. I hope they can survive on the shelf for a year or two. I removed them and sealed them in plastic bags. I took the air cleaner off and will be bead blasting it clean (again!) and powdercoating it satin black. I have a bunch of parts to powdercoat in the coming week, so I added this one to the pile. I took about fifty photographs of the carburetor linkages so I'll know how to put them together again in the future. I loosened all the nuts holding both the intake and exhaust manifolds to the block, and they came loose without much effort. I was actually prepared for a fight with them. I was especially careful to loosen them gradually and from the center out because I've heard stories about cracked manifolds. They're 60-year-old castings, after all, and who knows what kind of stresses they've been through. I'd also guess that long castings for the side of a straight-8 probably aren't the most durable configuration. So I used extra care in their removal, which was truly a piece of cake.
The exhaust manifolds were a little tougher to remove because I had to free them from the exhaust Y-pipe first. Like any exhaust system, the clamps were secured by bolts that had rusted into one piece and were nearly inaccessible. No surprise there. With my trusty impact wrench, I spun them off pretty easily, but went slowly to avoid putting any stress on the manifolds. With the Y-pipe off, the manifolds came off easily.
Then I removed the generator and its brackets, the fuel and vacuum lines (I'm going to remake these in stainless when I put the engine back together), and the fuel pump. I also removed the water pump pulley and fan assembly for blasting and powdercoating later this week. In the photo above, you can see the finished product of today's efforts. The engine components came apart very easily, which was a nice contrast to the headaches I've been having in the interior. I'm thinking about having the exhaust manifolds Jet-Hot coated to try to control some of the heat soak into the intake manifold. The intake and exhaust manifolds share a pair of thermostatically-controlled flapper valves which direct heated exhaust gas to the bases of the cold carburetors to speed warm-up. In theory this is a good idea for cold weather. But for this particular car, I think I'll secure them in the closed position to keep the carbs as cool as possible. Jet-Hot has an industrial gray color so it will look authentic and won't deteriorate like paint or other coatings do. I figure that anything I can do to help this thing run cooler will only make it a better road car. I may also have the exhaust manifolds Extrude-Honed to help flow, but we'll see what that costs. When I did my Mustang's intake manifold, it was $450.00(!). It may not be worth it for such a small improvement on this car. Next up: more powdercoating and removing the rear suspension.
E-mail me at toolman8@sbcglobal.net This page accessed Thanks, Fidget! |