What's up with this
banner thing?
If
you don't see a navigation bar on the left, CLICK HERE
|
|
|
August
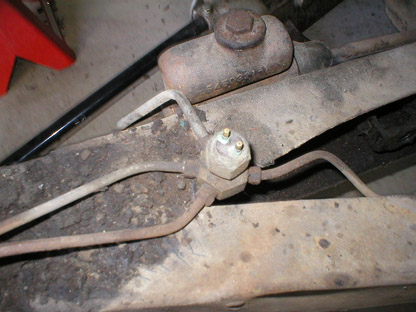
31, 2003 Brake System & Misc.I'm nearing the point where nothing else can happen on the car until I get the body off the frame and the frame to the powdercoater. I'm waiting to install some braces in the door openings on the advice of some other restorers more experienced than I, and I don't have my welder yet. It should be here shortly, however, so we'll get back to the really big stuff then. Today I removed the remains of the front brakes, including the master cylinder, as well as the distribution block and lines. Nothing surprising here except that I could not remove the rear line from the distribution block, even using flare wrenches--it just rounded off the fitting. I guess I'll need to replace the junction block when I replace the brake lines.
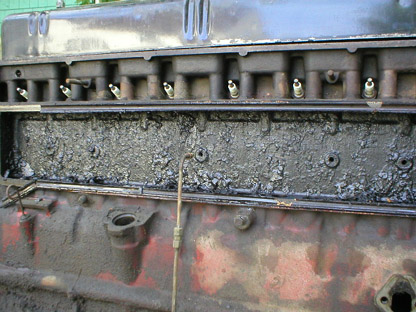
Once I did that, I got curious and decided to poke around with the engine a little bit. The first thing I did was remove the front engine mounts so I could send them out to be revulcanized and restored. While I was there, I removed the pushrod cover on the passenger's side of the engine to see what it looked like in there. Here's what I found:
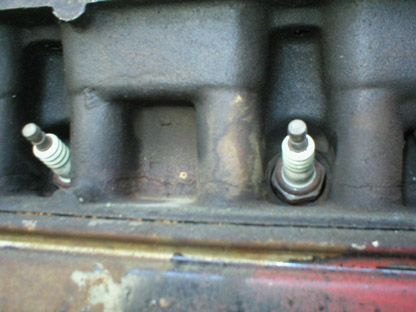
The innards of the engine are really neglected. You've already seen the gunk inside the engine from when I first removed the valve cover, but somehow I expected the side areas to look a little better. They don't. I'm glad I decided against driving very far on this engine. One thing I did notice was what appears to be a hairline crack running along the head casting right through the middle of the spark plug holes.
Concerned, but not overly, I continued with some busywork removing the last remnants of parts from the interior. The only things that weren't removed that could be unbolted were a pair of brackets for holding the radio under the dashboard. They consist of a pair of steel stampings with cad-plated brackets for holding the radio by two pegs on the radio housing. They unbolted easily, and I'll powdercoat the stampings and re-plate the brackets using my Caswell kit, on which I'm still developing my plating skills. With that, there are almost no parts left that I can remove from the car and no more "little jobs" that can keep me busy.
So that was it for today. I did a few other things, cleaned up the garage so Julia could put the Miata back in there again, and started disassembling the windshield wiper transmissions for plating, but I'll have more on that in the next installment. Somewhere between now and tomorrow, I also hope to think of a topic and write September's "Spinning My Tires." We'll see if that all happens on my Labor Day. Previous
Restoration Day E-mail me at toolman8@sbcglobal.net This page accessed Thanks, Fidget! |