What's up with this
banner thing?
If
you don't see a navigation bar on the left, CLICK HERE
|
|
|
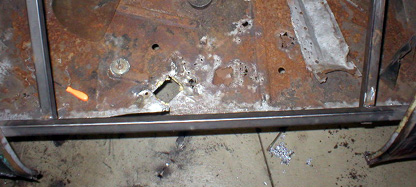
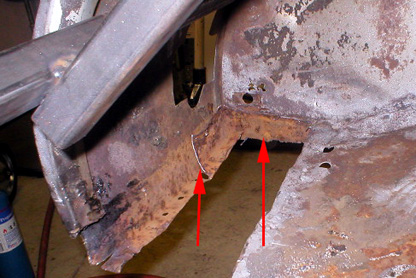
October 17, 2004 Trunk Repairs Part 2There's good news and bad news today. First, the good news: I am gainfully employed as the new marketing director of the Center for Health Affairs, an advocacy group for doctors and hospitals here in Cleveland. I turned down a job in the auto industry because I don't want to be pigeon-holed into being a "car guy" in both my personal and professional lives. I decided to keep the cars as my hobby but branch out into new fields which I think will help my career. I'm very excited about the position and look forward to starting there on the 27th. That also gives me ten full days to work on the Buick without feeling guilty about not having a job! Now the bad news: the Buick's trunk is in REALLY bad shape. I went out today and was planning on trying to fabricate a panel for the very rear-most area, a panel that I cut out a few weeks ago. But before I could do that, there were other areas that needed attention and they kept jumping out at me. Every time I thought I was good to go, it seemed like something else wasn't quite right. I ended up cutting the rear brace out of the car--good thing I welded in those supports a few weeks ago!
I started out just trying to get everything under the floor correct, especially the rear brace which had been crudely welded together. I wanted to cut it apart and weld it back together straight, then dress the welds to make the repair invisible. So that's the first thing I did. But as I worked, it became increasingly obvious that the brace would have to come out in order to reinstall the floor that sits on top of it. The original floor folds around the brace, sandwiched between the fender and the brace. The amount of Oragami required to put it back together again indicated that I wouldn't just be able to weld in a new floor, but that everything had to come out.
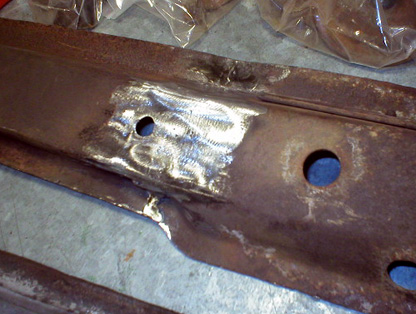
The good news is that I have a replacement part for the back of the trunk opening, so I will be able to cut it to length and stitch it in there to tie the two sides back together. Then I can make a new floor pan and weld it in place. Then the part on top of the brace and finally the brace itself, which will be spot-welded to the inner fenders, floor and trunk opening. Putting it apart in the same order in which it was originally assembled seems the easiest way to do this.
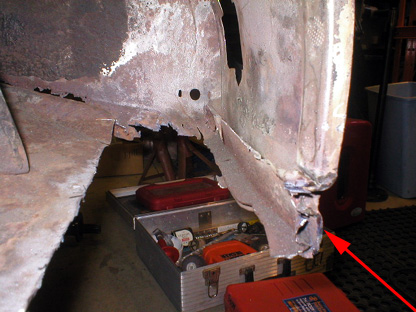
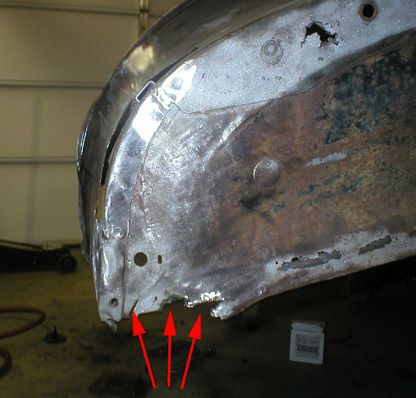
I am thinking that I will have to do some substantial additional cutting of the rear panels of the car's sheetmetal, particularly under the taillights. Not only are the trunk floor and outer panels welded together, but the outer panels are somewhat crunched and wrinkled. Making a new one, while probably difficult, will probably give me better results than trying to make the bent and rusty originals work. I'll have to make sure I cut as little as possible, since it is a complex curve, difficult to duplicate with a hammer and dolly, or even advanced metalworking tools like an English Wheel (I've got one of my own design in the works).
I'll probably have to do the same on the driver's side of the car, though the quarter panel is in somewhat better shape since it was replaced at some point. Unfortunately, as you know if you're a regular reader, the guys who did this work were real hacks, and welded everything in the repair area to everything else. I have to do a lot of cutting just to get back to zero to begin repairs.
Like I said, I have 10 days to work on the car unadulterated. I'm going to give it 8 hours a day for at least this week and see how far I get. Hopefully I can get the trunk finished and the brace back in this week so I can mount the body on the rotisserie and get it to the sandblaster. If all goes as planned, I should also be taking the frame to the powdercoater this week or early next. Jobs have a way of kicking projects into high gear, especially jobs with a nice pay raise! Things should really start to happen quickly in the coming months: I'm going to try to have the car ready for judging at the 2006 BCA Nationals in New England. Previous
Restoration Day
E-mail me at toolman8@sbcglobal.net This page accessed Thanks, Fidget! |