What's up with this
banner thing?
If
you don't see a navigation bar on the left, CLICK HERE
|
|
|
March
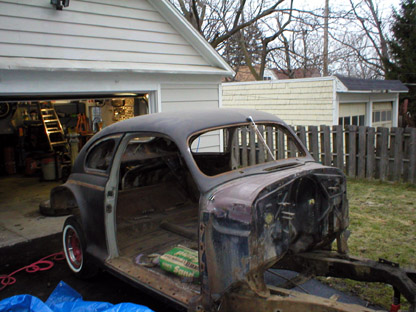
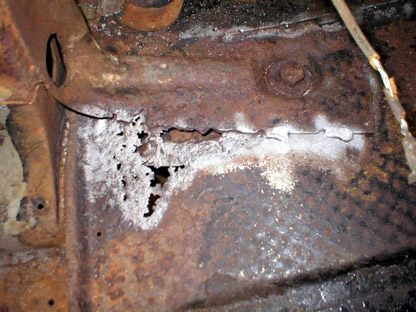
1, 2004 SandblastingBefore I can do more repairs on the floor, I wanted to make sure that I had clean metal to which I could weld the patch panels. The areas I needed to use to secure the next panels were too tight for a wire wheel to clean the metal. Instead, I pulled out my tiny sandblaster, which is really only good for very small areas, and loaded it with some sand I picked up at Home Depot for $3.00 for 50 pounds (cheap is good). Then I rolled the Buick out into my driveway for the first time in more than a year, set up a tarp around the work area and started blasting away.
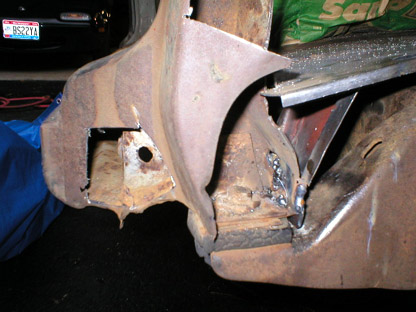
I hooked the air hose the sandblaster and had at it. Remember when sandblasting to protect yourself: eye protection and a quality respirator are the minimum you should use when sandblasting. The sand particles can cause silicosis, a very bad disease that destroys your lungs. And the damage is cumulative, so every exposure to silica increases your chances of being sick. Don't take chances, OK? Today's weather was funny, too. It rained early in the day, but it was warmer than it's been in months, which enabled me to work outside. The rain stopped around 2 this afternoon, and by the time I was outside, it looked like it was going to clear up. I rolled the Buick out, set up my equipment, poured the sand, and as soon as I connected my air hose to the sandblaster--pssht--it started raining again. Since I was working under the tarp, I blasted anyway. But ideally, I'd prefer to work on a dry day. Anyway, back to the repairs. Beginning with the cracked body mount on the firewall, I worked my way around the lower passenger's side floorboard area and cleaned all the areas I expected to need to use for welding. I also blasted some areas that still looked questionable in terms of damage and tried to clean out some inaccessible areas in the rocker panels. I found some additional damage in the lower cowl section as well as on the inside rocker panel. On Special and Century sedanettes, the rocker panels are boxed, making the rockers very prone to rusting from the inside out. Looking at the damage, I'm thinking about cutting them open from behind to blast them, then seal them back up with fresh metal. We'll see.
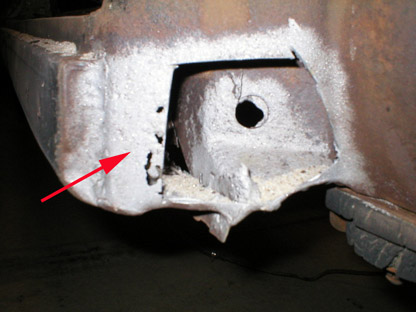
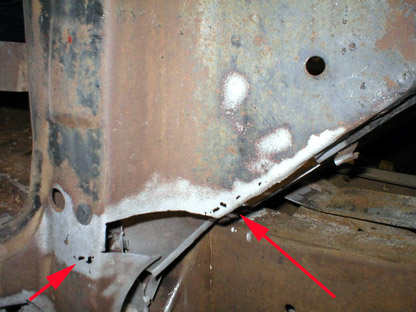
The blasting was S L O W work (I have to invest in a more powerful sandblaster), but it effectively cleaned up the inaccessible areas I wanted to work on. The blasting also revealed some additional damage that I hadn't seen prior. The good thing about blasting is that bad metal can't hide. When you use a sander or a wire wheel, sometimes thin metal is enough to hide damage on the other side. With a sandblaster, it pushes right through the damage and eats away all the thin areas. For this reason, I like to sandblast trouble-prone areas, even if they look OK on initial inspection. Never sandblast exterior body panels, however, because they can warp easily. Why take chances?
None of the additional damage will be difficult to repair; it'll just involve some more cutting and welding to make sure everything stays solid. One area where I did discover some significant damage was on the driver's side under the same body bracket where the passenger's side was so bad. I thought there was some minor perforation, but it turns out to be more extensive than I thought. Fortunately, the repair isn't difficult and I have a lot of confidence after working on the passenger's side floors.
For the driver's side, I'm thinking that I'll cut away the bracket on top of the floors and try to do the repairs from the top instead of from the bottom. I'm hoping that the bracket on the bottom of the body is in better shape than it was on the passenger's side and that it won't require total replacement. I'm going to have to make a new upper bracket for the passenger's side anyway, so doing one for the driver's side won't be any more difficult. I'm going to finish the passenger's side floor panels before I attack the driver's side damage. That way I have an original area to work from to ensure that I get everything right when I start welding. Oh, I also put photos of Julia's Miata at the Dual Carb Registry's Buy/Sell/Trade message board. If you want a clean little roadster this spring, I've got one...
E-mail me at toolman8@sbcglobal.net This page accessed Thanks, Fidget! |