What's up with this
banner thing?
If
you don't see a navigation bar on the left, CLICK HERE
|
|
|
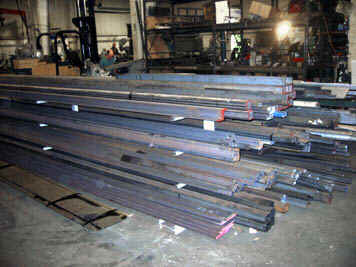
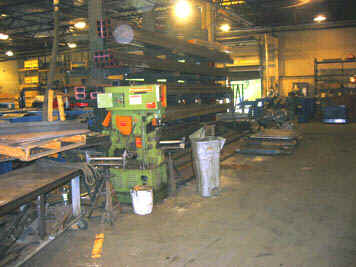
Spinning My Tires is one man's view of the world of cars. Random thoughts, ideas and comments pop up here, all of them related to owning, driving and restoring cars. I've been doing this car thing as long as I can remember, and have enjoyed a great many car-related experiences, some of which I hope to share with you here. And I always have an opinion one way or another. Enjoy. E-mails are welcomed--if you have thoughts of your own to share, please send them. Additional Spinning My Tires editorials can be found on the Archives page. 6/25/04 Rotisserie Construction Wow! This is the 20th editorial I've written for this site, and June 2004 marks the end of the second year of working on the Buick. Looking back, I see a lot of progress, but I also see that I'm not meeting many of my goals and the project is moving slower than I'd hoped. With that in mind, I decided that I needed to kick this thing into high gear and get some serious work done. That means removing the body. That means it's time for a rotisserie. I decided to document the construction of my rotisserie here instead of in the restoration logs because it really isn't a restoration item. In addition, I'm really strapped for topics to write about right now, and since it's almost July, well, I figured I could merge the June and July Spinning My Tires editorials into one. I've been busy at work, traveling a lot, and it's been hard to find time to work on the car, let alone write. I also wrote my first article for the Buick Bugle, the BCA's national publication. You'll be able to see that in the July issue. So I haven't been slacking, but I have been quite short on time lately. Like many of you, I looked all over the Internet for pricing and designs, and found a lot of options, from nice professional units to really cobbled-up amateur units that I wouldn't use to rotate my lawn mower. I also work in a machine shop that uses A LOT of steel--there are literally tons of steel sitting just 50 feet from my desk. I also need to practice my welding. Between those easy facts and the idea that I believe I can build a better rotisserie for less money, I set out to design my own.
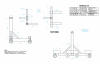
The first fault I've seen on a lot of rotisseries out there is that they are either too narrow or the wheels are placed in such a way as to make them the most vulnerable area for breakage. I plan to roll this thing around, and even up onto a trailer to take the body to the sandblaster and painter, so it has to have good, solid wheels. With certain wheel outrigger designs, I also think there will be too much flex, making it difficult to really put force into what I'm doing on the car without it wobbling around. I wanted to start with a solid foundation. The second fault I've seen is inadequate tubing size. Yes, I know I over-engineer everything I do, but for something that is potentially going to support several thousand pounds in a variety of different positions that move the center of gravity around, I decided that bigger is better. Most rotisseries I've seen use 2" square tubing, which looks kind of spindly. Some designs add small corner gussets made from plate steel, but unless they are substantially taller than those I've seen, they're pretty useless in preventing flex. My design remedies that problem, too. Initially, I wanted to use 4" square, 1/4" wall tubing, but the price of steel being what it is (about $0.72/lb.) makes that cost-prohibitive (that first design required over $800 in steel!). Instead, all of the tubing on my rotisserie will be 3/16" wall thickness, and range from 3-inch square down to 2-inch square along with some 3" x 2" rectangular tubing. The sizes I've chosen are common and easy to find, and will fit together without much extra effort. That really helps during assembly, especially since there are several slip joints and pivots on the thing. The third fault is height and center of gravity problems. A rotisserie has to be high enough to fully rotate a car body, but not so high that it becomes top-heavy. This situation is exacerbated by wheels bolted under the braces or to the ends of the braces, which tends to raise the center of gravity. I designed my wheels to be "underslung" (anyone remember the American Underslung cars from the teens?), dropping the center of gravity considerably and freeing up valuable room in garages with low ceilings like mine. On a flat concrete or asphalt floor, ground clearance is not an issue. Finally, there's tying the two ends together. Some do, some don't. I don't like the idea of the body being used as a structural part of the assembly. This can lead to some twisting or torque that can easily be prevented by running a beam between the stands. Again, I'm using thick steel here to make it as rigid as possible. One feature I often see is height adjustability on the main upright using a hydraulic jack system. While this seems like a good idea in theory, it's important to remember that unless the centers of rotation on each end are on the exact same axis, the thing won't rotate very well. That's why I've left my rotation pins in fixed locations on the uprights and instead built the height adjustability into the brackets that actually attach to the car. With this setup, different heights between the front and rear of the body can be accommodated without affecting ease of rotation. I'll also add a pair of grease zerks in the pivot sleeve to keep it lubricated and easy to move. To make my design strong, all the joints must be welded. Unfortunately, that means that my rotisserie will not be very portable, and with the thick steel, it'll be heavy. On the positive side, adapters can easily be made to convert it into a pair of heavy-duty engine or transmission or differential stands. I think that's a fair trade-off for strength. Check out the print below to get an idea of size and portability.
I also had one of the structural engineers here at the shop take a look at my plans and materials. He ran a stress analysis on it and said that it should be good to at least 5000 pounds, probably more. The casters (from Caster Connection) I've spec'd are rated for 800 lbs. each, and there are 4 on each stand (fortunately, they're less than $15 each). I could probably rotate a complete car on this rotisserie, though I can't imagine why I'd want to. Still, it never hurts to have capacity you won't use, right? Here's the complete materials list:
On the upcoming pages, I'll take you step by step through the construction and show you how I do it. I think it's the best design out there and plenty strong for any car you're likely to be working on. Page 1 Page 2 Page 3 Page 4 Page 5 Page 6 Page 7 Page 8 Page 9 FINAL Update E-mail me at toolman8@sbcglobal.net This page accessed Thanks, Fidget! |